fizkes/Getty Image
A Step-By-Step Guide On How to Do Camel Pose (Plus 3 Modifications)
This backbend will challenge, strengthen, and stretch your body.
By Hillary Hoffower•
What Is Camel Pose (Ustrasana)?
The Benefits of Practicing Camel Pose
How to Do Camel Pose
Why Is Camel Pose So Difficult?
How to Progress to Camel Pose
Key Tips for Camel Pose
Craving a deep, satisfying backbend? Consider practicing Camel Pose, a yoga asana known as Ustrasana in Sanskrit. With a shape resembling a camel’s hump, the full expression of this heart-opening yoga posture can be daunting to those trying it for the first time. But with the right adjustments, you can find a variation that works for you.
So, why do it? Beyond lengthening your back, Camel Pose stretches and strengthens everything from your chest to your quads, and the benefits don’t stop there. Here’s what you need to know.
What Is Camel Pose (Ustrasana)?
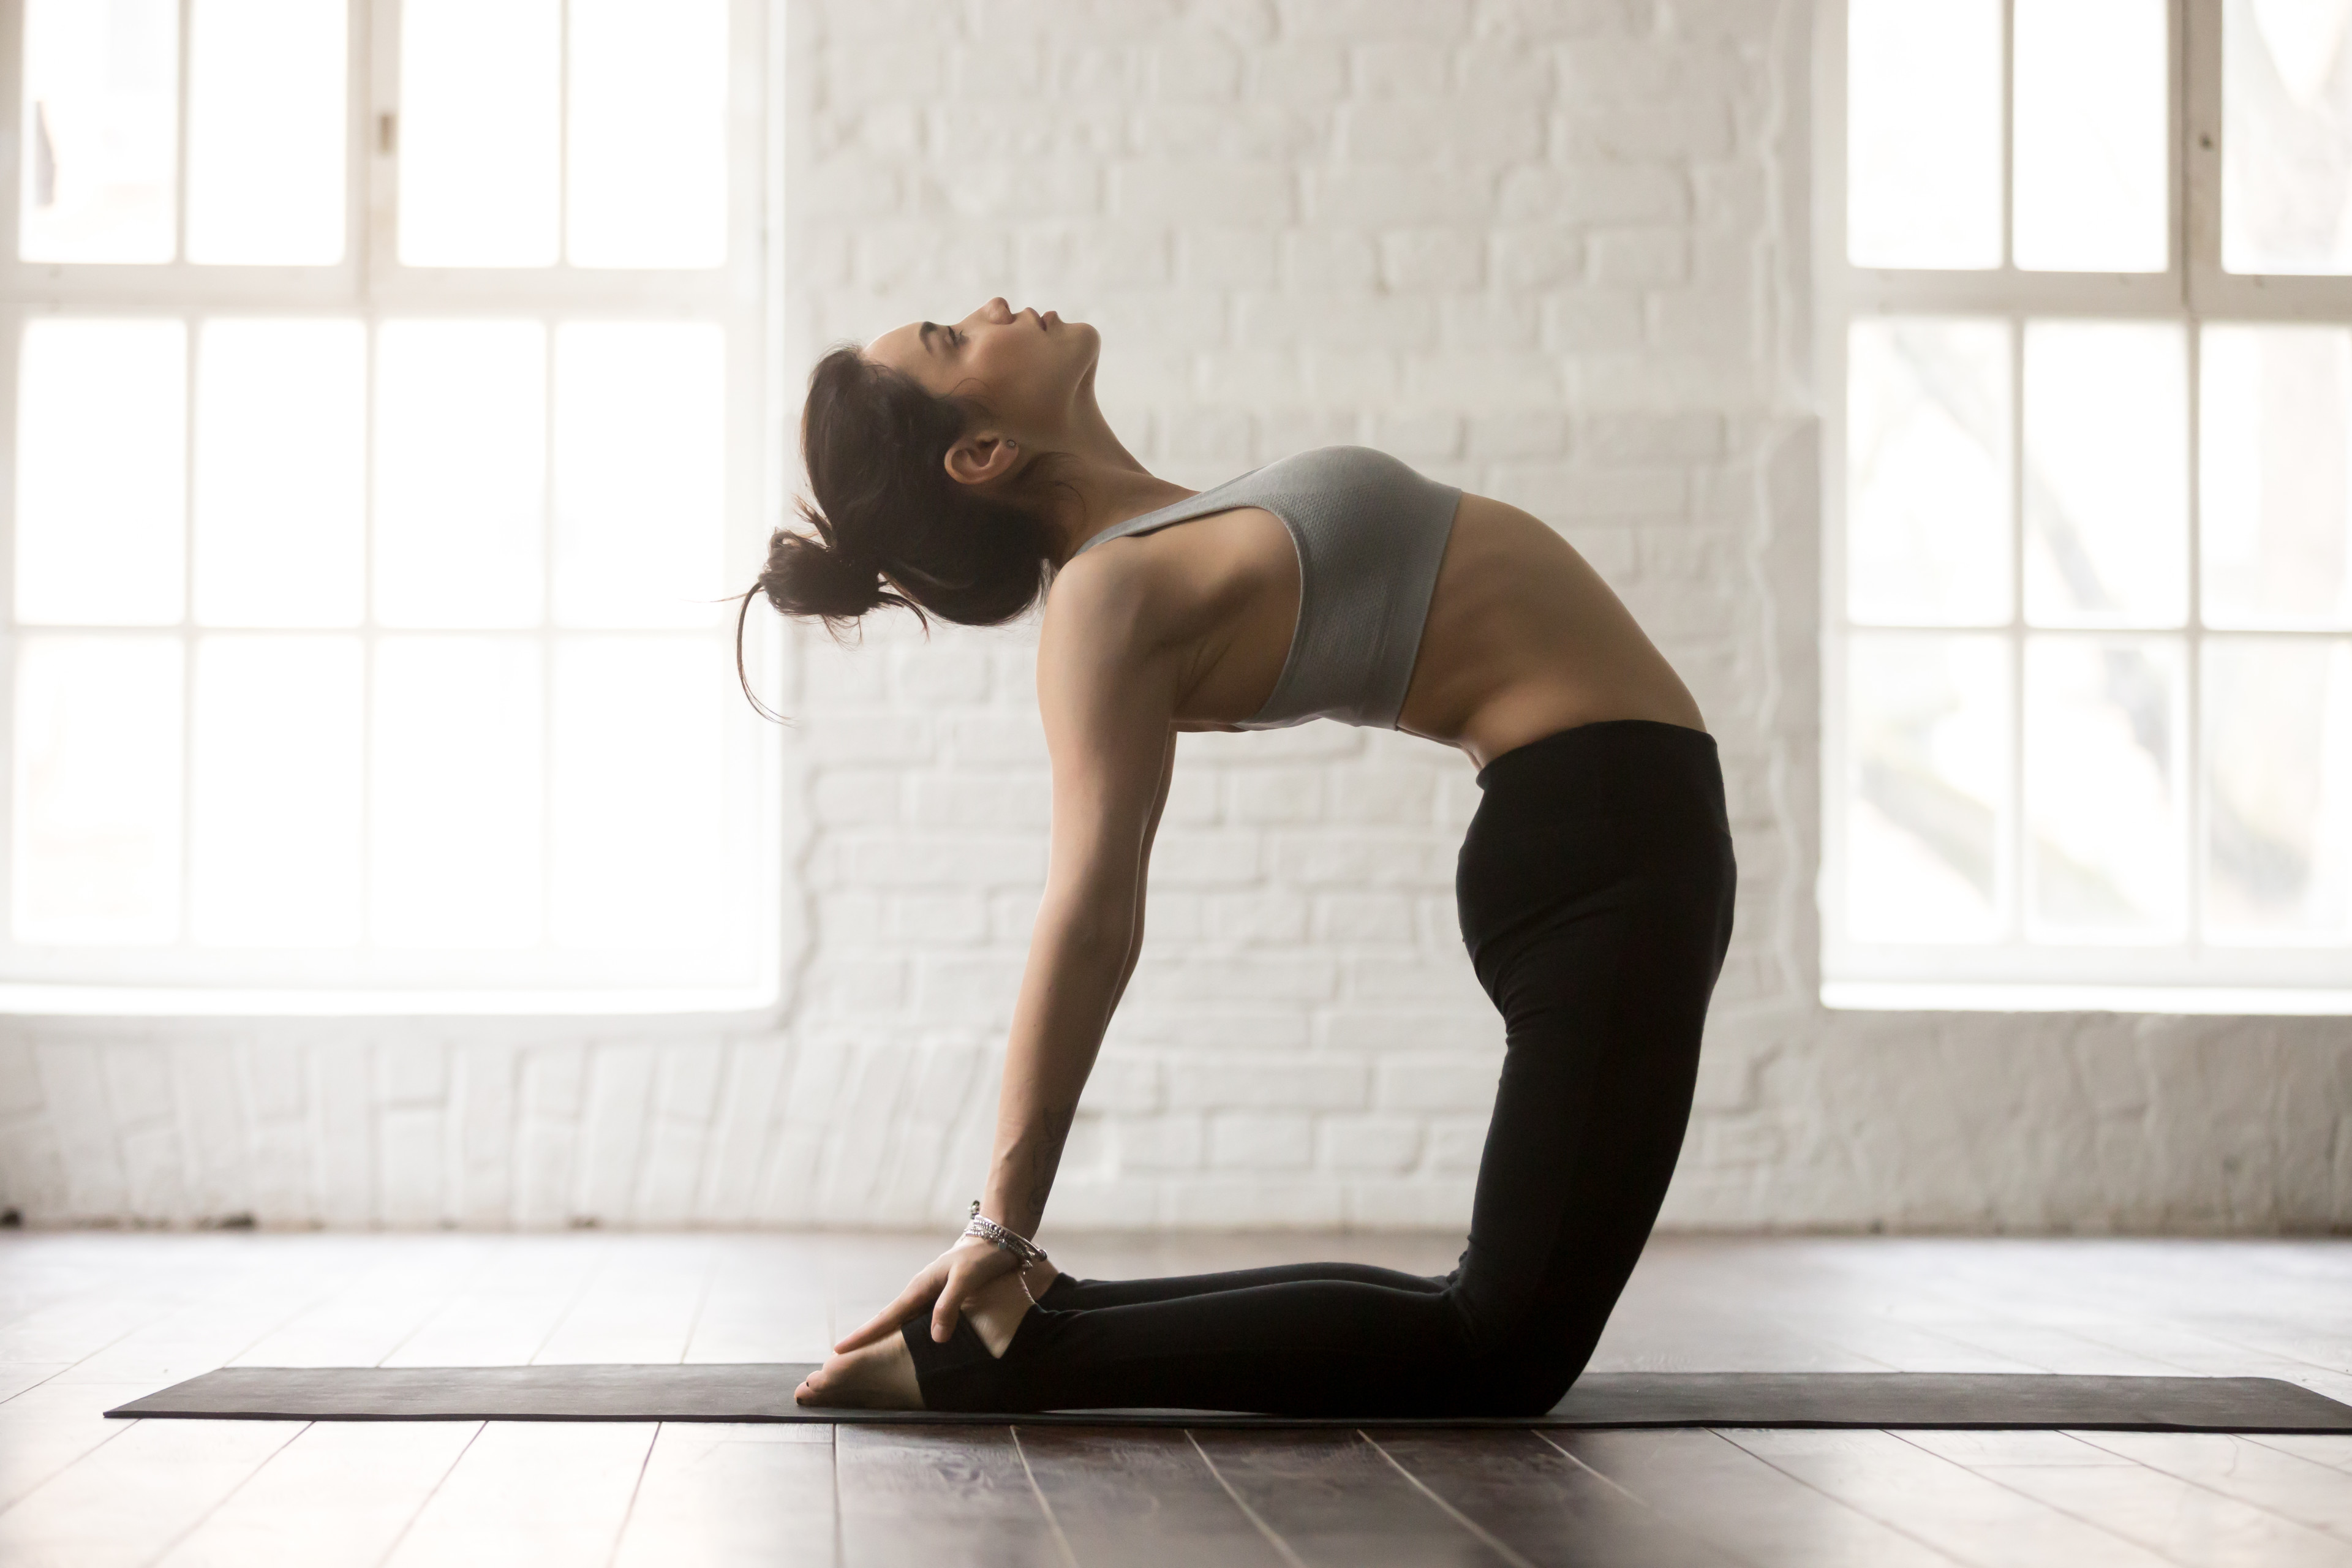
Camel Pose is a backbend that involves standing on your knees and bending backward until your hands rest on your heels. Different instructors use it for different purposes in their classes, according to Peloton instructor Aditi Shah, so don’t expect to always see it in the same sequence. When done correctly, Camel Pose helps improve your flexibility, strength, and posture. Because it’s a more intense asana, instructors often cue it toward the middle or end of class, by which point you’ve already warmed up your body.

Peloton App
Access thousands of classes with no equipment needed.
The Benefits of Practicing Camel Pose
Incorporating Camel Pose into your yoga flow can be therapeutic. Of course, it has physical benefits—such as strengthening your quads, glutes, and calves while stretching your lower leg muscles, hip flexors, and quads—but it can boost your mental health too. Below, we list some of the main upsides of practicing this heart opener.
It opens your chest. Camel Pose helps open your chest and lungs while also opening you to the opportunity to be vulnerable and your most authentic self, Meredith Weiss, a physical therapist who runs Kioko Therapy in Fort Lauderdale, Florida, says.
It lengthens your spine. Simultaneously stabilizing your front and back muscles while practicing Camel Pose lengthens your spine. “This anterior-posterior harmonious relationship keeps your head and low back from not only collapsing into hyperextension, but to support the ultimate goal of elongating and energizing the entire length of the spine while optimizing and stabilizing the flow of energy, breath, grace, and power,” Weiss explains.
It strengthens your core. “All of this opening requires skillful core stabilization to protect our spine, no different than having our own personal emotional ground rules to protect our heart and our energy,” Weiss says. Plus, your side abdominal muscles, diaphragm, and the muscles in between your ribs also work to stretch and stabilize your spine and ribs in Camel Pose.
It challenges your balance. Camel Pose tests your stability and balance, and the more you practice the backbend, the more you'll improve both. And having solid balance can serve you in just about every type of exercise, whether you’re looking to stay upright in standing yoga moves or maintain proper form during strength training sessions.
It helps improve your posture. Camel Pose can improve spinal flexibility, a benefit many of us need. According to a study published in JAMA, one in four American adults spend a minimum of eight hours a day sitting down. A sedentary lifestyle (and the poor posture that can often result from it) can increase your risk for health ailments like heartburn, and constipation. Keep in mind that although practicing Camel Pose can help your posture, Weiss clarifies it’s not going to magically fix it.
It can boost your mental well-being. As a heart-opening pose, this posture can improve emotional regulation and give you an opportunity to tune into your body. “Camel Pose challenges us to be open and steady to life’s challenges while keeping our breath, our spine, and our mind lengthened, resilient, and most importantly, stable,” Weiss says.
How to Do Camel Pose
Don’t expect to bend backward into Camel Pose with ease on your first go. This posture takes practice, and progress might not come as quickly as you’d like. Be patient with yourself and remain open to taking modifications. Below, Aditi explains how to do Camel Pose.

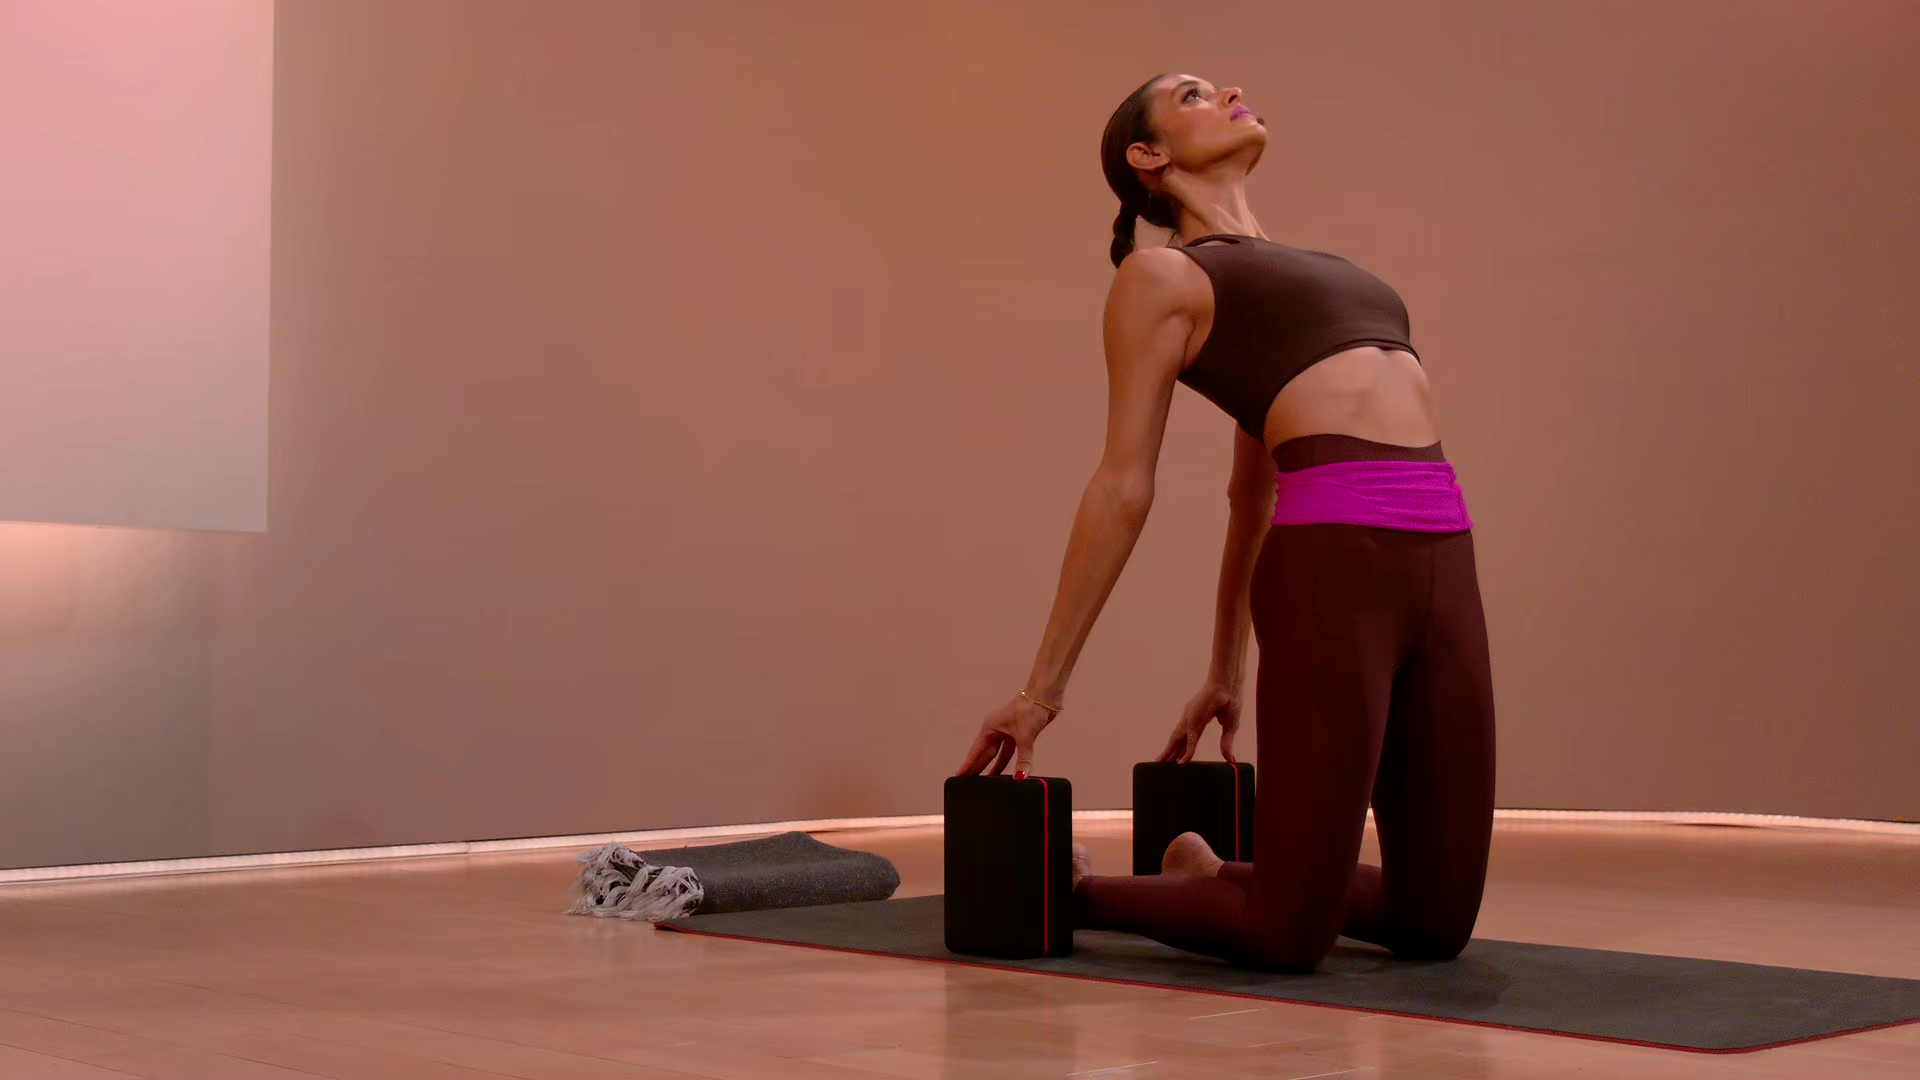
Kneel with your knees under your hips and your toes untucked, keeping your feet pointed. If you’d like to take a modification, use a blanket under your knees as a cushion and place yoga blocks outside your ankles.
Pull your belly button in, tucking your tailbone slightly so your pelvis is in a neutral position.
Bring your hands to your waist and pull your elbows back toward one another. Keep your shoulder blades knitted together.
Start to lift your breastbone toward the ceiling to begin your backbend. Keep space in your low back. Feel your upper back work to create a lift in your chest.
Pause here. Release your neck back in line with the spine if it feels comfortable.
Stop here or take your hands to your heels and continue backbending. To modify, take your fingertips or hands to the blocks.
Press into your shins to come up and out of the backbend, restacking your spine.
Rest in Hero Pose (Virasana) and breathe.
When you finish practicing Camel Pose, you can counter the backbend by taking Forward Fold (Uttanasana).
Why Is Camel Pose So Difficult?
If Camel Pose feels hard to you, you’re not alone. It’s challenging for many people (even those who have been practicing yoga for years). Aditi says that while the reasons why vary from person to person, it’s often because many of them aren’t accustomed to doing backbends. “We’re used to reaching forward in our lives,” she explains. “If you want to grab something from your cabinet, you’re reaching out in front of you, not behind you.”
Camel Pose also requires a great deal of trust and confidence. “It can feel risky to lean back into something without being able to see or know what's there behind us,” she adds. “We have to trust that our shoulder blades and upper back will support the backbend, and that we won't fall. We also have to continue to breathe, though it might feel harder to do so. All of this can feel challenging.”
Common Mistakes in Camel Pose
Camel Pose can feel uncomfortable for beginners, and many of them make one of the following errors:
Getting into the pose too quickly. You should approach Camel Pose slowly. Avoid going into the posture without first building the necessary flexibility to avoid discomfort, pain, or injury.
Compromising your form. Not lengthening your spine before moving into a backbend and using your hands to press your hips forward instead of activating your glutes are just some of the mistakes Weiss sees people make while practicing Camel Pose. “Keep your hips over your knees in the backbend and avoid leaning back,” Aditi says.
Collapsing into your neck and low back. “Keep your low back as spacious as you can. Think about distributing the backbend evenly, so your chest is lifting,” Aditi says.
How to Progress to Camel Pose
“Learning the basics of safe backbending is extremely important before jumping into Camel Pose,” Aditi explains. Here are few yoga postures you can do to help you prepare:
Sphinx Pose (Salamba Bhujangasana): A gentle backbend in which you lie on your stomach, placing your forearms on the ground as you lift your chest.
Cobra Pose (Bhujangasana): A milder, reclined backbend that stretches the front of your body. It’s a good starting point for beginners.
Locust Pose (Salabhasana): A prone, backbending pose that involves lying on your stomach, lifting your arms straight behind you, and raising your lower legs off the floor.
Low Lunge Pose (Anjaneyasa): A pose that allows you to bend backwards with your arms in the air.
How to Modify Camel Pose
You by no means have to practice the full expression of Camel Pose to reap its benefits. For some people, a modification may be a better option. Those with existing back issues (or any condition that leads you to avoid spinal extensions) should approach this pose with caution and start with a more beginner-friendly version, according to Weiss. Even beginners with a healthy back should ease into Camel Pose, modifying it until they feel more flexible and confident. Here are a few ways to bring down the intensity.
Put your hands on your hips. “Place your hands on the sides of your hips, pressing down into your hips to actively lengthen the hips out of the waist. Grow taller through the entire spine and ensure your neck and shoulders aren’t shrugging up to try to help,” Weiss says.
Put your hands on your low back. Instead of putting your hands on your heels, place them on your low back for added support.
Rest your hands on yoga blocks instead of on your heels. You can adjust the blocks’ height until you find a level that feels comfortable. This is an especially useful option for pregnant practitioners.
Key Tips for Camel Pose
When it comes to trying a challenging yoga posture, like Camel Pose, for the first time, it can be easy to get caught up in what you can’t do or how far you have to go. But it’s crucial to remember that this pose requires patience, and the modifications are just as worthwhile as the full expression.
“Give yourself time and grace. Poses are just a direction to move in, and it's valuable to remember that any variation of the pose is still the pose,” Aditi says. “It may not matter if you ever do a full Camel Pose—and it certainly doesn't determine whether or not you are a yoga practitioner.”
“The point of a yoga asana practice is not necessarily to do the fullest or deepest expression of something,” she adds. “In my opinion, it can be more valuable sometimes to use postures to better understand how we relate to ourselves and our experiences, and further our practice of yoga off the mat.”
And although there’s a lot to think about during Camel Pose—lengthening your back, keeping your hips over your knees, and placing your hands on your heels—don’t forget to take full, deep breaths and check in with how your body is feeling.
This content is for informational and educational purposes only and does not constitute individualized advice. It is not intended to replace professional medical evaluation, diagnosis, or treatment. Seek the advice of your physician for questions you may have regarding your health or a medical condition. If you are having a medical emergency, call your physician or 911 immediately.
Want to strengthen your yoga practice?
We can help. Enter your email to get articles, instructor tips, and updates from Peloton sent to your inbox.
By providing your email address, you agree to receive marketing communications from Peloton.
For more about how we use your information, see our Privacy Policy.


