
mihailomilovanovic / E+ via Getty Images
If You Want to Work Your Lower Abs, Try Reverse Crunches
Shake up your core strength routine with this simple yet powerful move.
By Erin Bunch •
What Are Reverse Crunches?
The Benefits of Doing Reverse Crunches
How To Correctly Do a Reverse Crunch
Reverse Crunch Modifications
Variations for Reverse Crunches
Common Form Mistakes to Avoid


Crunches are classic abdominal exercises that almost everyone has engaged in at one point or another. For many, crunches are a non-negotiable part of their regular workout routine, and some people even do them daily. So much repetition, however, can get boring—which is why it might be nice to mix things up by trying reverse crunches instead.
Reverse crunches are just as easy to integrate into your routine as a regular crunch, and they offer additional benefits beyond just being a boredom buster. Below, Peloton instructor Olivia Amato describes those benefits, provides step-by-step instructions for executing reverse crunches properly, and offers modifications and variations for athletes at every level of fitness, from beginner to advanced.
What Are Reverse Crunches?
“A reverse crunch is an abdominal exercise that targets the lower abdominal muscles,” Olivia says. More specifically, the reverse crunch is a deep lower core exercise that mainly works your otherwise hard-to-reach “six-pack muscle,” the rectus abdominis. It’s a slightly more intermediate take on a crunch, but one that’s still appropriate for all levels of fitness.
How Is a Reverse Crunch Different From a Regular Crunch?
“The main difference between a reverse crunch and a regular crunch is the direction of movement and the primary muscles targeted,” Olivia says. “In a reverse crunch, you lift your hips towards your chest, targeting the lower abs, while in a regular crunch, you lift your upper body towards your knees, targeting the upper abs.”
Are Reverse Crunches Safe For Your Back?
Reverse crunches are absolutely safe for most peoples’ backs if you do them with the proper form, Olivia says. This can be achieved by engaging your core muscles throughout the exercise to support your lower back and stabilize your spine. Avoid jerky movements by moving slowly, and focus on using your core to lift your hips off the floor, rather than relying on momentum.
If you have neck or back injuries, however, you may want to abstain from doing reverse crunches or, at the very least, talk to your healthcare provider before incorporating them into your workout regimen. And like regular crunches, reverse crunches should be avoided during pregnancy.
The Benefits of Doing Reverse Crunches
Reverse crunches offer several specific benefits, according to Olivia. Here’s what you can expect to gain when you start incorporating the move into your routine.
1. A Stronger Core Overall
“Reverse crunches target the [tricky-to-access] lower core muscles and improve overall core strength,” Olivia says. These muscles include not only the rectus abdominis but also the transverse abdominis, which is the deep core muscle that stabilizes your spine and core, and the external obliques, which are the muscles on the side of your six-pack. “Improving overall core strength plays a vital role in stabilizing the spine to support us during functional movements,” Olivia adds. That makes everyday tasks, such as caring for children or working in your garden, easier for your body.
2. Improved Pelvic Mobility
Reverse crunches can be beneficial for activities that require pelvic mobility and stability, whether that’s other types of exercise or just regular activity in your daily life, Olivia says.
3. Avoid Potential Injuries
The reverse crunch is less stressful on the neck than a traditional crunch, and may be less stressful on the back too.
4. A Convenient Workout
Reverse crunches don’t require any equipment, and can be done as standalone exercises in any space at any time.
5. Shake Up Your Routine
Sometimes it’s good to try a new challenge. “Reverse crunches also bring variety to your workout and are fun!” Olivia says.

How To Correctly Do a Reverse Crunch
As Olivia noted, proper form is crucial when executing a reverse crunch. Below, she offers step-by-step instructions on how to do a reverse crunch correctly.
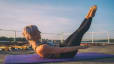
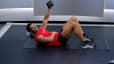
Lie flat on your back on a mat or a comfortable surface.
Bend your knees and lift your legs so that your thighs are perpendicular to the floor and your shins are parallel to the floor.
Place your hands flat on the floor or mat beside you for stability.
Engage your core muscles and lift your hips off the floor by curling your pelvis toward your chest.
Pause for a moment at the top of the movement, then slowly lower your hips back down to the starting position.
Repeat slowly and with control.


Reverse Crunch Modifications
If you’re new to reverse crunches, or feel any discomfort when you engage in them, there are a few modifications you can try out, keeping in mind that, “the number one focus is on maintaining proper form and technique to maximize the effectiveness of the exercise and prevent injury,” Olivia says.
Add support: Place your hands under your hips for added support and to keep your lower back from arching.
Decrease your range of motion: If you feel like you’re using momentum rather than ab strength to lift and lower your legs, try decreasing the overall range of motion in your legs and hips so that you’re only lifting them as high as you can without relying on momentum.
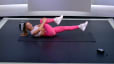
Keep one foot down on the floor: This modification is done in exactly the same way as a regular reverse crunch, except that you’ll only crunch one knee to your elbow instead of both. One foot should be flat on the mat at all times.
Variations for Reverse Crunches
If you feel like you’ve mastered the reverse crunch with proper form, you can switch up the move to make it more challenging, Olivia says. Here are a few variations to try:
Intensified Reverse Crunch
To make your reverse crunches more advanced, Olivia recommends crunching more quickly while maintaining proper form.
Add Ankle Weights
Perform a traditional reverse crunch exactly as instructed above, but add ankle weights to further challenge your core.
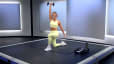
Straight-Leg Reverse Crunch
To execute this variation, follow the traditional reverse crunch instructions above, but keep your legs straight throughout the crunch rather than in tabletop position.
Combined Crunch
A combined crunch is basically a traditional crunch and a reverse crunch done simultaneously, which means you’ll be lifting both your shoulders and your legs/hips into the air at the same time. To execute this move, lift your lower body as described for a traditional reverse crunch, but instead of keeping your head, shoulders, and arms on the ground as you do so, cradle your neck with your hands and bring your elbows to your knees as you crunch upwards with your lower body. You can start this move with your legs in tabletop position, or with your feet flat on the ground.
Common Form Mistakes to Avoid
It’s not easy to maintain proper form when doing a reverse crunch, but it's important for both safety and efficacy. Here, Olivia breaks down a few common mistakes she sees people making when they try to execute this move.
Moving too quickly. “It’s very important to focus on controlled movements,” she says.
Using your hip flexors too much. You should be utilizing your core to lift your hips.
Lifting too high off the mat. “This can strain your lower back,” Olivia says. “Lift just enough to contract the lower abdominals and bring the knees into the chest.”
Not breathing during the exercise. You should breathe in as you lift your hips off the mat, and breathe out as you lower them back down to the ground.
Allowing your lower back to arch. This can cause strain to your spine, so it’s important to keep your lower back neutral.
Using momentum. The movement should be controlled on the way up and on the way down, and you should be using your abdominal muscles rather than just swinging your legs.
Jerking the body up and down without control. The ultimate key to this move is control, control, control!
Remember: While reverse crunches may be challenging or uncomfortable, they should never be painful. If you experience pain, stop the exercise. And if you’d like to see proper form demonstrated, check out core strength classes on the Peloton App.

This content is for informational and educational purposes only and does not constitute individualized advice. It is not intended to replace professional medical evaluation, diagnosis, or treatment. Seek the advice of your physician for questions you may have regarding your health or a medical condition. If you are having a medical emergency, call your physician or 911 immediately.

Level up your inbox.
Subscribe for a weekly dose of fitness, plus the latest promos, launches, and events.
By providing your email address, you agree to receive marketing communications from Peloton.
For more about how we use your information, see our Privacy Policy.
