fizkes/ iStock / Getty Images Plus via Getty Images
You Shouldn't Be Scared of Yoga Inversions. Here's How to Nail Going Upside Down
(You may even grow to love them.)
By Ingrid Yang•
What Are Yoga Inversions?
Why Should You Practice Inversions?
The Benefits of Yoga Inversions
The Risks of Yoga Inversions
How to Work Toward Inversions
6 Yoga Inversions to Try
Common Mistakes When Practicing Inversions
Inversions in yoga are like the salt of a dish: A small pinch can transform the whole experience. While you may assume that inversions have to be complex or intense, such poses go beyond Handstand (Adho Mukha Vrksasana) or Supported Headstand (Salamba Sirsasana), encompassing a broad range of energizing, restorative, and even therapeutic postures. With inversions, you’ll find that they flip your perspective upside down—both literally and metaphorically. Here, we break down everything you need to know about inversions, including how to do them safely, what they are, who should avoid them, and common mistakes.
What Are Yoga Inversions?
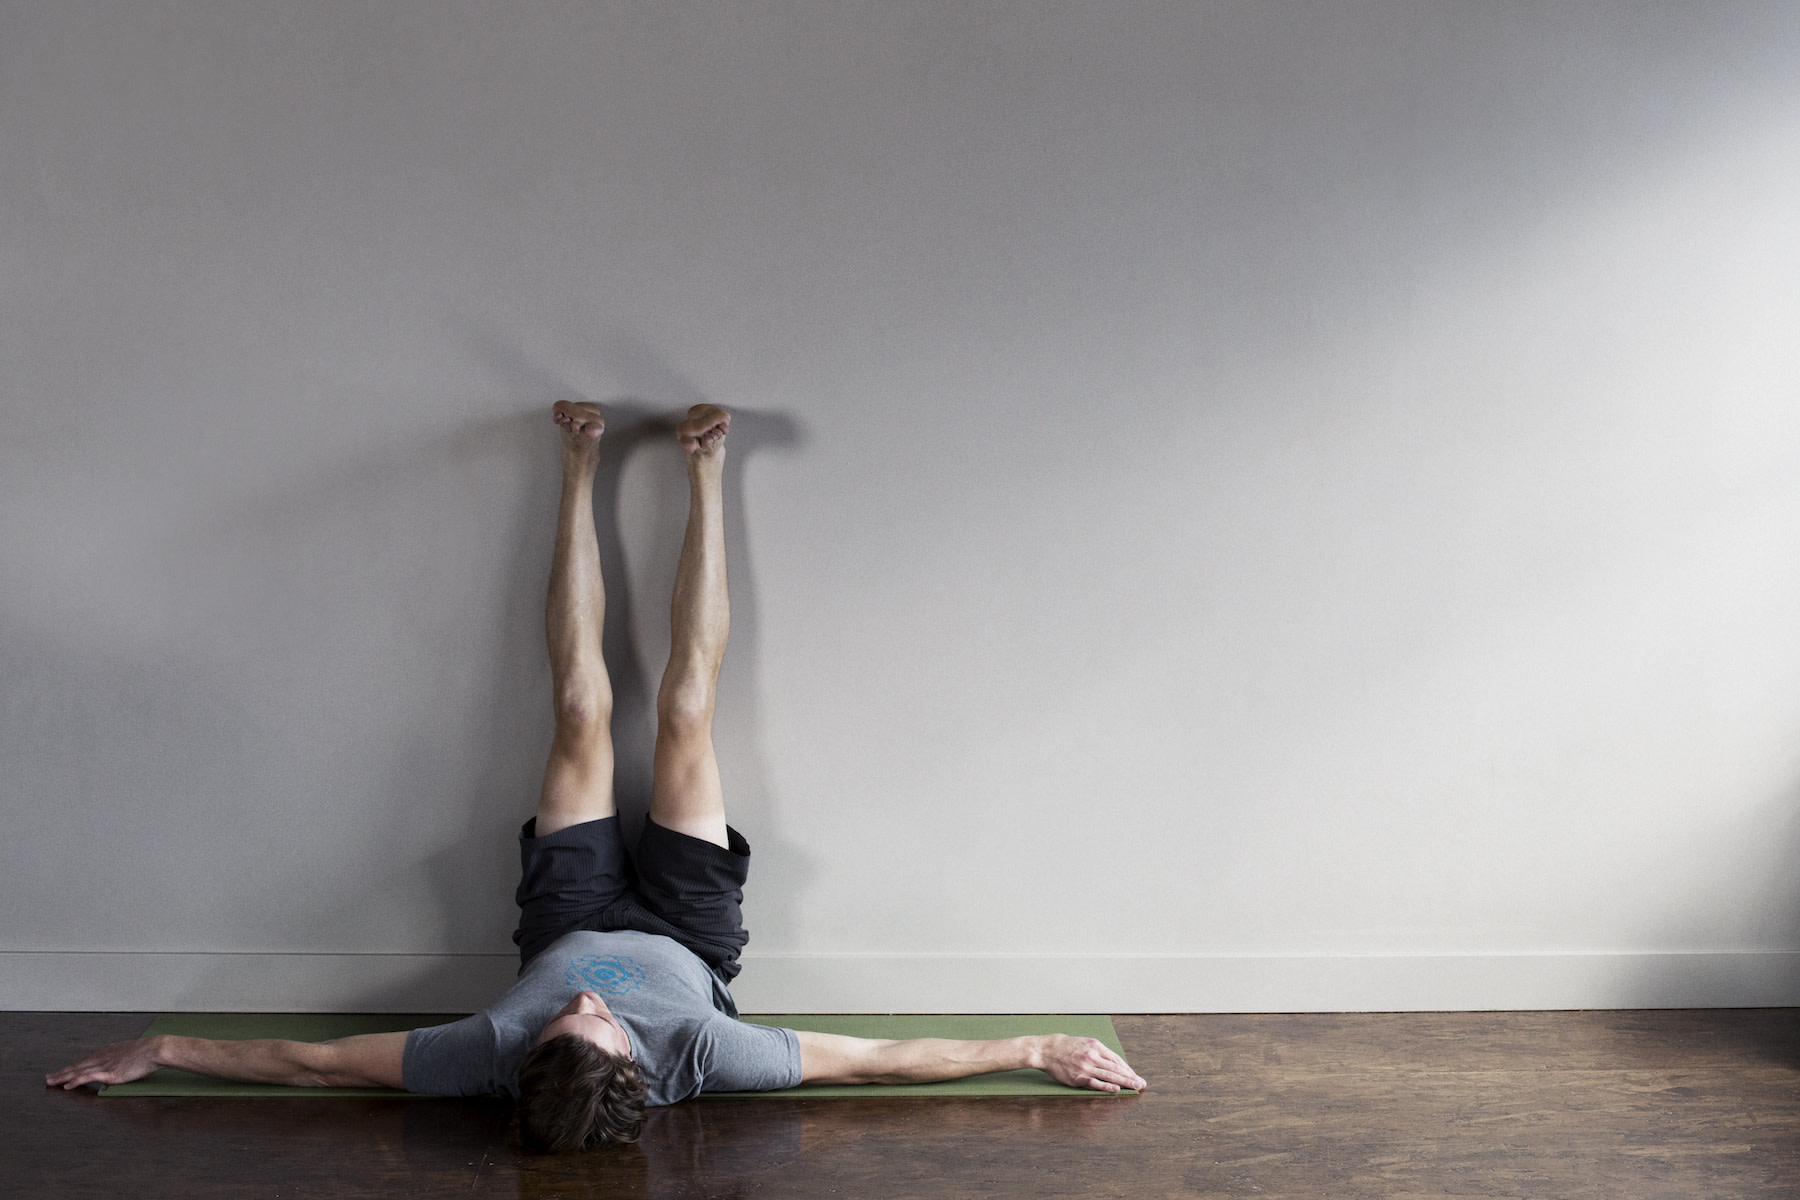
In yoga, an inversion is defined as any pose where your heart is higher than your head. So, yes, this includes those complex poses, such as Handstand and Dolphin Pose (Ardha Pincha Mayurasana), as well as more calming postures, such as Child’s Pose (Balasana) and Legs Up the Wall Pose (Viparita Karani).
Why Should You Practice Inversions?
Inversions are more than just challenging physical feats, says Peloton instructor Kristin McGee. “They are also journeys into self-awareness; teaching balance and concentration, and offering a new perspective on the world,” she says. “I find inversions push me out of my comfort zone and require me to really practice often. I can't just expect to master one right away, it takes time and patience.”
It’s a concept she’s experienced frequently in her practice. While she fell in love with headstands and forearm balances quickly, she says she found Handstand to be more challenging. “They are much more difficult to hold; so I've been working on them very diligently recently,” she says.
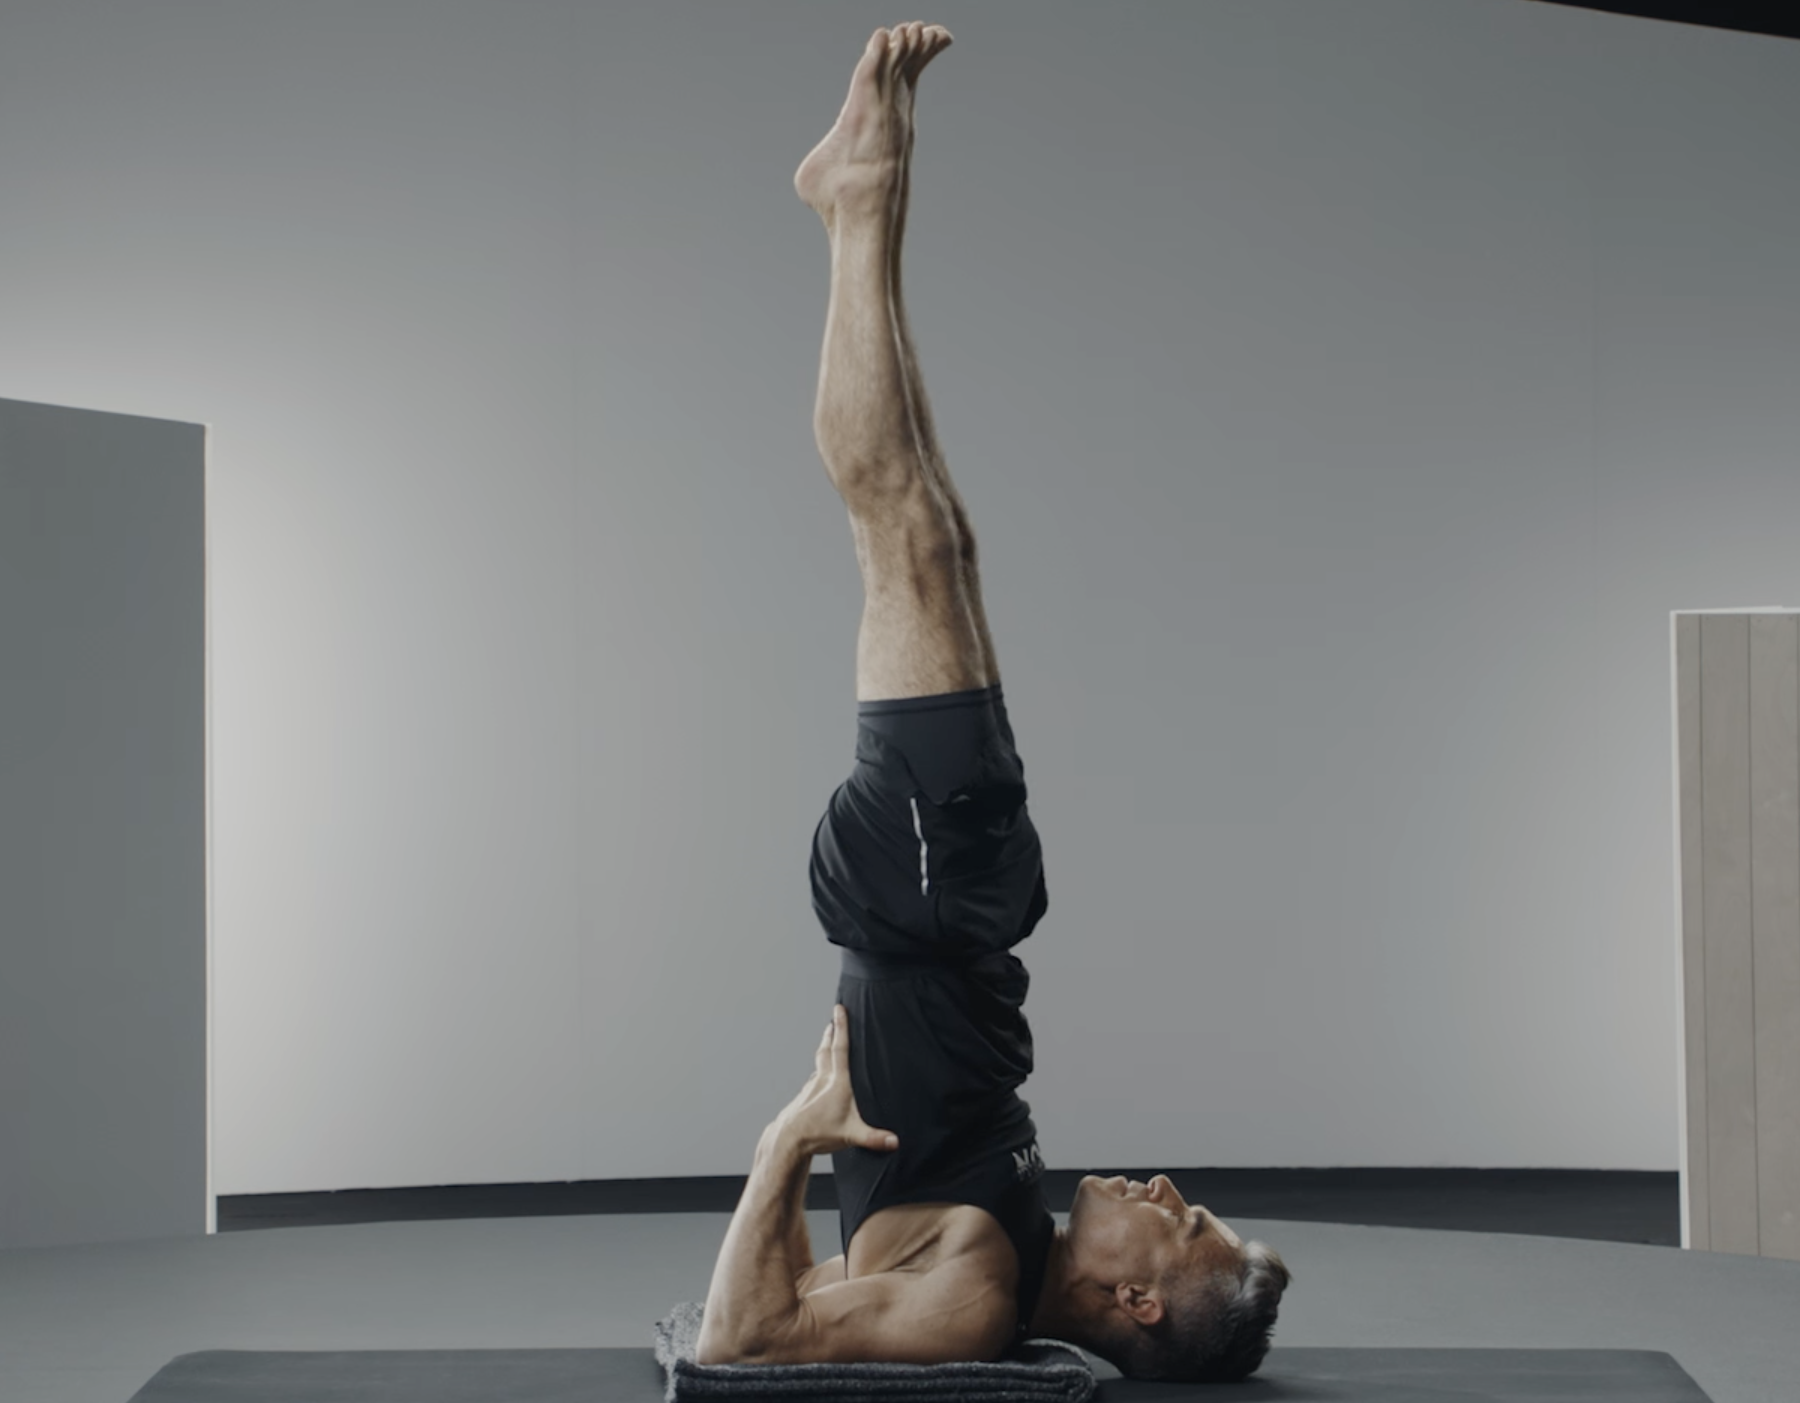
If you’re a beginner, Kristin recommends trying a more accessible inversion, such as Shoulderstand (Sarvangasana)—especially if you’re afraid to go forward—before launching into a more complex posture.
The Benefits of Yoga Inversions
Curious about some of the benefits of inversions? Here, we break down a few of the mental, physical, and emotional perks.
Increased core strength: Holding an inverted position requires you to engage your core muscles. By regularly practicing core-strengthening postures, such as Boat Pose (Paripurna Navasana) and Plank Pose, you can strengthen these muscles, contributing to improved posture and balance.
Stress relief: Certain inversions, especially restorative ones, can activate your parasympathetic nervous system, which is responsible for your body's 'rest and digest' response, potentially leading to increased relaxation and reduced stress levels.
Enhanced body awareness and control: Regularly practicing inversions can improve your proprioception, which is the awareness of your body in space, helping boost your balance and coordination.
Mood elevation: Physical activity, including yoga inversions, can stimulate the release of endorphins, your body's natural mood elevators.
Boosted immune system: While direct scientific evidence is limited, the lymphatic system, which plays a key role in immune function, can benefit from movements that change the orientation of your body and potentially improve your lymphatic circulation.

Peloton App
Access thousands of classes with no equipment needed.
The Risks of Yoga Inversions
Inversions are not for everyone. If you have high blood pressure, a heart condition, or a neck injury, exercise caution before practicing these types of postures—or avoid them altogether.
Can You Practice Inversions While Pregnant?
It depends on several factors, including the specific type of inversion, the stage of pregnancy you’re in, your personal skill level with yoga, and any additional pregnancy-related complications. The risks of practicing inversions during pregnancy include falls, increased intraabdominal pressure, elevated blood pressure, and joint stress. Make sure to speak with your physician about whether practicing inversions makes sense for you and your body.
How to Work Toward Inversions
If you’re a beginner, you can work toward inversions by focusing on building your core and upper body strength, Kristin says. "The stronger we feel, the less scary it is," she adds. And don’t forget about your breath. “Use only the energy you need for that pose or inversion and try to get out of your own way,” she says.
Kristin recommends practicing specific drills to build up your strength, such as Dolphin Pose for Headstand and wrist-strengthening exercises for Handstand. These preparatory practices are crucial for safely approaching more advanced inversions.
6 Yoga Inversions to Try

GibsonPictures/E+ via Getty Images
Sit beside a wall. Gently swing your legs up against the wall as you lay back onto your mat. For added support, place a cushion or folded blanket under your hips.
Your body should form an L-shape with your back on the ground and your legs resting up the wall. If you feel too much of a stretch in your hamstrings, keep a slight bend in your knees.
Keep your arms relaxed by your sides or on your belly.

Dolphin Pose
Start in a tabletop position. Lower your forearms to the ground, keeping your elbows shoulder-width apart. If keeping your arms parallel to one another is challenging, place a yoga block between them.
Tuck your toes and lift your hips up, forming an inverted V-shape. If it’s difficult to keep your legs straight, put a slight bend in your knees.
Maintain a relaxed neck. Gaze toward your feet.

Downward-Facing Dog Pose (Adho Mukha Svanasana)
Begin on your hands and knees. Your wrists should be directly under your shoulders. Your knees should be directly beneath your hips. (If you have wrist pain, you can opt to use yoga blocks.) Spread your fingers wide, tuck your toes, and lift your hips upward, forming an inverted "V" shape with your body.
Press your hands into the ground, extend your spine, and gently straighten your legs without locking out your knees. If you have tight hamstrings, keep a slight bend in your knees.
Keep your head in line with your arms.

Bridge Pose (Setu Bandhasana)
Lie on your back with your knees bent and your feet flat on the floor, hip-width distance apart.
Press your feet and arms into the floor as you lift your hips upward, keeping your thighs parallel to each other. For a more supported, restorative version of this posture, place a yoga block under your sacrum.
Clasp your hands under your back or keep them flat on the floor for support.

Supported Shoulder Stand (Salamba Sarvangasana)
Lie on your back and lift your legs over your head, bringing your toes toward or onto the floor beyond your head. Keep your hands on your lower back for support or place them flat on the floor. To reduce neck strain, put a folded blanket under your shoulders.
Gradually straighten your legs upward, eventually pointing your toes to the sky. Keep your hands on your lower back for support.
Ensure your weight is on your shoulders, not your neck.

Start in a shortened Downward-Facing Dog with your hands firmly planted on the ground, shoulder-width distance apart.
Either kick up one leg at a time or carefully hop gently into the pose. (The key is focusing on shifting your hips over your shoulders.) This posture is complicated—make sure to begin by practicing against a wall for support or use a spotter.
Keep your core engaged. Focus your gaze on a spot between your hands or behind you to maintain a relaxed neck.
Common Mistakes When Practicing Inversions
Overstraining your neck: Some poses, such as Headstand, can place strain on your neck. Be sure to maintain proper alignment and distribute your weight evenly when practicing any inversion.
Insufficient core engagement: Make sure to engage your core to provide stability and prevent injury. Maintain a connection to your abdominal muscles, glutes, and quads.
Rushing into complex inversions: Progress into advanced inversions gradually. Make sure you’re prepared and can practice proper alignment before moving into any posture that’s new to you. Kristin suggests beginning with more accessible inversions, such as Downward-Facing Dog.
Skipping your warm-up or guidance: Make sure to start with a warm-up to prepare your body and reduce your risk of injury.
Not using props and modifications: Props and variations help strengthen your practice. Use them as necessary to make poses more accessible to you.
Ignoring your limits: Recognize and respect your body's limits. Yes, push yourself, but also prioritize a safe practice above all else.
Whether you're a complete beginner or a dedicated practitioner, understanding and trying inversions can add a new dimension to your yoga journey. Remember: The key is to approach them with patience, respect for your body's limits, and an open mind.
This content is for informational and educational purposes only and does not constitute individualized advice. It is not intended to replace professional medical evaluation, diagnosis, or treatment. Seek the advice of your physician for questions you may have regarding your health or a medical condition. If you are having a medical emergency, call your physician or 911 immediately.
This content is for informational and educational purposes only and does not constitute individualized advice. It is not intended to replace professional medical evaluation, diagnosis, or treatment. Seek the advice of your physician for questions you may have regarding your health or a medical condition. If you are having a medical emergency, call your physician or 911 immediately.
Level up your inbox.
Subscribe for a weekly dose of fitness, plus the latest promos, launches, and events.
By providing your email address, you agree to receive marketing communications from Peloton.
For more about how we use your information, see our Privacy Policy.


