
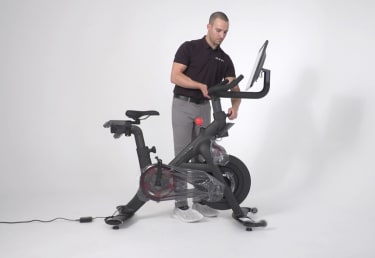
Setting up your new Peloton Bike+
We’re thrilled to welcome you to the Peloton family! Get ready to ride with these simple steps.
Step 1
Moving the Bike+
The Bike+ weighs 140 lbs/63.53 kilos with two wheels on the front stabilizers.
If Bike needs to be moved:
- Face the rear of your Bike+ and lift from the rear stabilizer and place the weight on the front wheels to wheel it to your destination.
- If your Bike+ must be carried, you’ll need two adults–one lifting from the rear stabilizer and the other lifting from the front monitor arm.
- Disconnect the touchscreen (if it’s not removed already).
- The front of your Bike+ should always be pointed downward, where most of the weight is held.

Step 2
Disconnecting & Reattaching the Touchscreen
To disconnect:
- Unplug power and audio cables from the monitor.
- Turn the monitor to face away from your Bike+.
- Tilt the monitor upward.
- Use a 4 mm Allen wrench to remove the touchscreen bolts from the monitor arm.
To reattach:
- Slide the monitor onto the monitor arm.
- Use a 4 mm Allen wrench to tighten the bolts onto the monitor arm. Be sure to tighten the bolts as much as possible.
- Rotate the monitor to face your Bike+.
- Connect power and audio cables to monitor.
Step 3
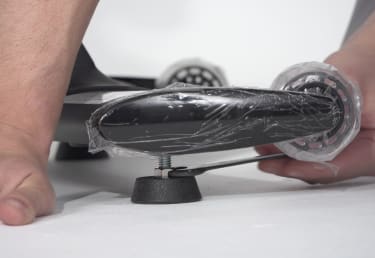
Stabilizing Your Bike+
- Turn the outer feet under the stabilizers counterclockwise until they rest firmly on the ground.
- Gently rock the Bike+ to make sure it doesn’t wobble.
Step 4
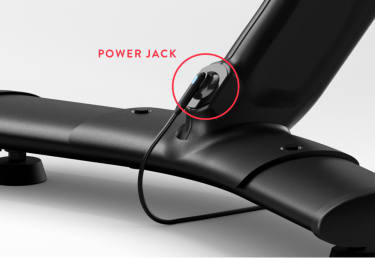
Powering on & Connecting to WiFi
- Plug in the power adapter to wall.
- Plug in the power adapter to rear of your Bike+.
- Select your WiFi network name (either 2.4 or 5ghz will be fine).
- Enter your password.
- Press the three dots on the top right corner of the screen.
- Press WiFi.
- Choose your WiFi network name.

Step 5
Calibrating Your Bike+
Allow your Bike+ to calibrate itself during first time install. Calibration of your Bike+ is essential to ensure proper brake function & that it is running on the most up-to-date firmware. Additionally, should you unplug and replug your bike, the brake will complete a “homing” cycle.During this time, refrain from touching the pedals and screen, as any form of movement on the pedal will interrupt the calibration. This calibration will sound like a printer. If calibration fails, unplug and replug.

Step 6
Activating Your Account
Input the email address and password used at purchase. If your Bike+ was a gift, enter your email address and activation code given to you by the team.
Setting up your profile
- Confirm your profile information.
- Create your Leaderboard name. (This is how your friends will find you!)
- Connect to Spotify or Apple Music to use the Track Love feature and save songs from class to your playlist.

Step 7
Getting to Know Your Homescreen
Your homescreen knows what you like and brings it front and center. The more classes you take, the more recommendations you get. You can also use filters and the search bar to find what fits you.
Find out more here.
Step 8
Using the New Features
Apple Gymkit™
- Select a live or on-demand ride.
- Live Class: Wait to pair your watch until the countdown clock is at 1 minute.On-Demand Class: Select the class. Click “Start” on the pop-up menu to enter the class.
- Tap unlocked Apple Watch to face the left of the camera at the top of the screen.
- Your watch will vibrate. An on-screen prompt will say “connecting.” The user must click “OK” on their watch to accept the pairing.
- Your watch will pair once class begins. A small green symbol will appear at the top right of the screen, indicating connection is active. The watch will automatically disconnect at the end of the ride.
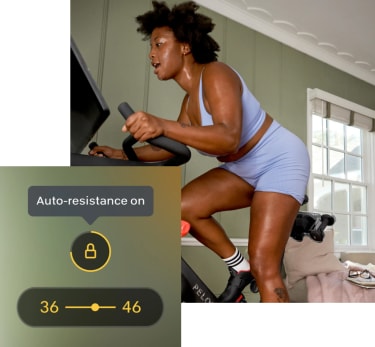
Auto Follow
- Select an on-demand class.
- On the resistance tab at the bottom right of the metric section, click the “lock” icon.
- Once the icon is highlighted, Auto Follow is on, and the resistance will automatically adjust itself during a class transition. A vibration on the handlebar indicates a change of resistance.

Step 9
Pairing Your Bluetooth
- Turn Bluetooth off on any device(s) that may want to connect to the device you want to pair to your Bike+.
- Set your device to pairing mode.
- Press the three dots on the top right of the screen to select Bluetooth.
- Select your device once it appears with the screen.
- Allow a few moments for the pairing process to happen.

Step 10
Miracasting
- Follow your device setting to accept Miracasting from your Bike+. (You must be on the same WiFi network as the divide your Bike+ will be mirroring to.)
- Press the three dots on the top right of the screen to select mirroring. (This will open a new menu showing the device you watg to connect to.)

Step 11
Perfect Your Setup and Form With Peloton 101
Improve your setup and form to ensure you feel comfortable and are getting the most out of your ride.
If you need assistance setting up or activating your Bike, please give us a call
866-440-7445
For any additional help, reach out at: 866-679-9129
For International support:
UK: 0808 169 6469
CA: 833-821-0099
DE: 0800-0001841