Setting up your new Guide
Congratulations and welcome to the Peloton family. Let’s set up your Guide.
Please read all warnings and safety information before setting up or using the Peloton Guide.

Step 1
Find a Place for Your Peloton Guide
Where you place your Peloton Guide in relation to your workout area is important.
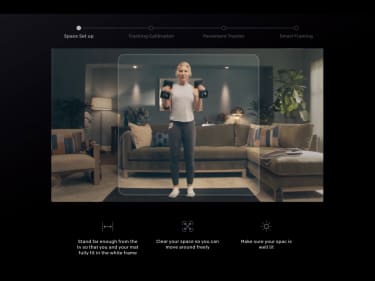
- Make sure you have at least 4.5 x 6 feet/1.4 x 1.8m of unobstructed space to work out in—about the size of two yoga mats side by side.
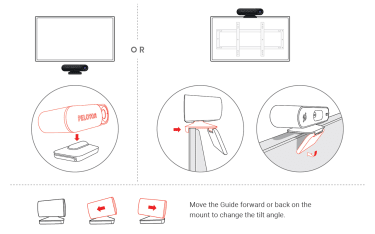
- Try to place it 3 to 6 feet/0.9 to 1.8m from the ground, with an unobstructed view of your workout area. The Guide can sit close to the edge of a flat, stable surface, or be mounted on top of an anchored flat-screen TV.
- For some exercises, like push-ups, you might need to rotate your mat so that it’s parallel with the Guide, giving it a better view of your position.
- Avoid having speakers, lights, or sources of movement pointed directly at the Guide.

Step 2
Set up Your Peloton Guide
Your Peloton Guide package contains everything you need to turn your TV into an interactive Peloton strength experience.
- Unpack the Guide. Your Peloton Guide package includes the Guide, a remote control, a mount, a power supply and an HDMI cable.
- Insert the included AAA batteries into the remote.
- Attach the hub unit to the magnetized mount. Place it on a flat surface or mount it securely on top of an anchored flat screen TV.
- Turn off your TV. Plug the HDMI cable into the back of the Guide and an HDMI input on your TV.
- Plug the power cable into the adapter and the back of the Guide. Plug the power adapter into a wall socket.
- Turn on your TV and set it to the Guide’s HDMI input. When you see an image of the remote on the screen, press any button to begin activating your Guide.

Step 3
Set up Your User Interface + Activate Your Account
Once you turn the Guide on, it will walk you through everything you need to get going.
- Connect to a WiFi network.
- Calibrate the microphone and camera.
- Create or connect an account and activate your subscription. Need help? Access support page here.

Step 4
Finding a Class
- Tap into your strength with guided strength training from our world-class instructors.
- Choose a class from one of the categories on your home screen, or select the Classes tab to browse within a category.

Step 5
Taking Your First Class
- Use filters to narrow down your selection by instructor, class type, difficulty and more.
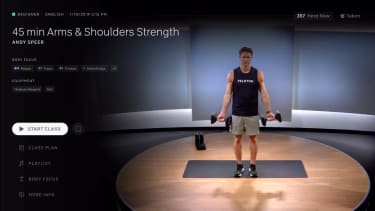
- When you’re ready to begin, select Start Class.

Step 6
Movement Tracker and Self Mode
- Classes on your Peloton Guide are broken down by movements. Select a class with the Movement Tracker feature and follow the demonstrated exercises. The Movement Tracker will tell you how much of each segment you’ve spent on a designated movement.
- Self Mode lets you see yourself on the screen so you can check your movements and compare your form to the instructor’s

Step 7
Body Activity & Strive Score
- Body Activity shows you which muscle groups are used in a class
- Strive Score uses your heart rate zone to show how hard you’re working during a particular class.
- Here Now lets you see the other Members taking the class.

Step 8
Unlock for Strength. Lock for Privacy.
- Slide open the Peloton Guide camera to step into your strength journey and just as easily slide it closed to lock it.
- Disconnect microphone for additional privacy.
- You can also manage your privacy features in Settings.
If you need assistance setting up or activating your Guide, please give us a call
US: 866-440-7445
UK: 0808 169 6469
CA: 833-821-0099
US ONLY: For any additional help, reach out at 866-679-9129.