AJ_Watt/E+ via Getty Images
Downward-Facing Dog Is a Key Yoga Pose—Here's How to Do It Correctly
It's so much more than a transitional posture.
By Michele Ross•
The Benefits of Downward-Facing Dog
How to Do Downward-Facing Dog
Common Mistakes to Avoid
4 Tips for Nailing Downward-Facing Dog
Variations to Downward-Facing Dog
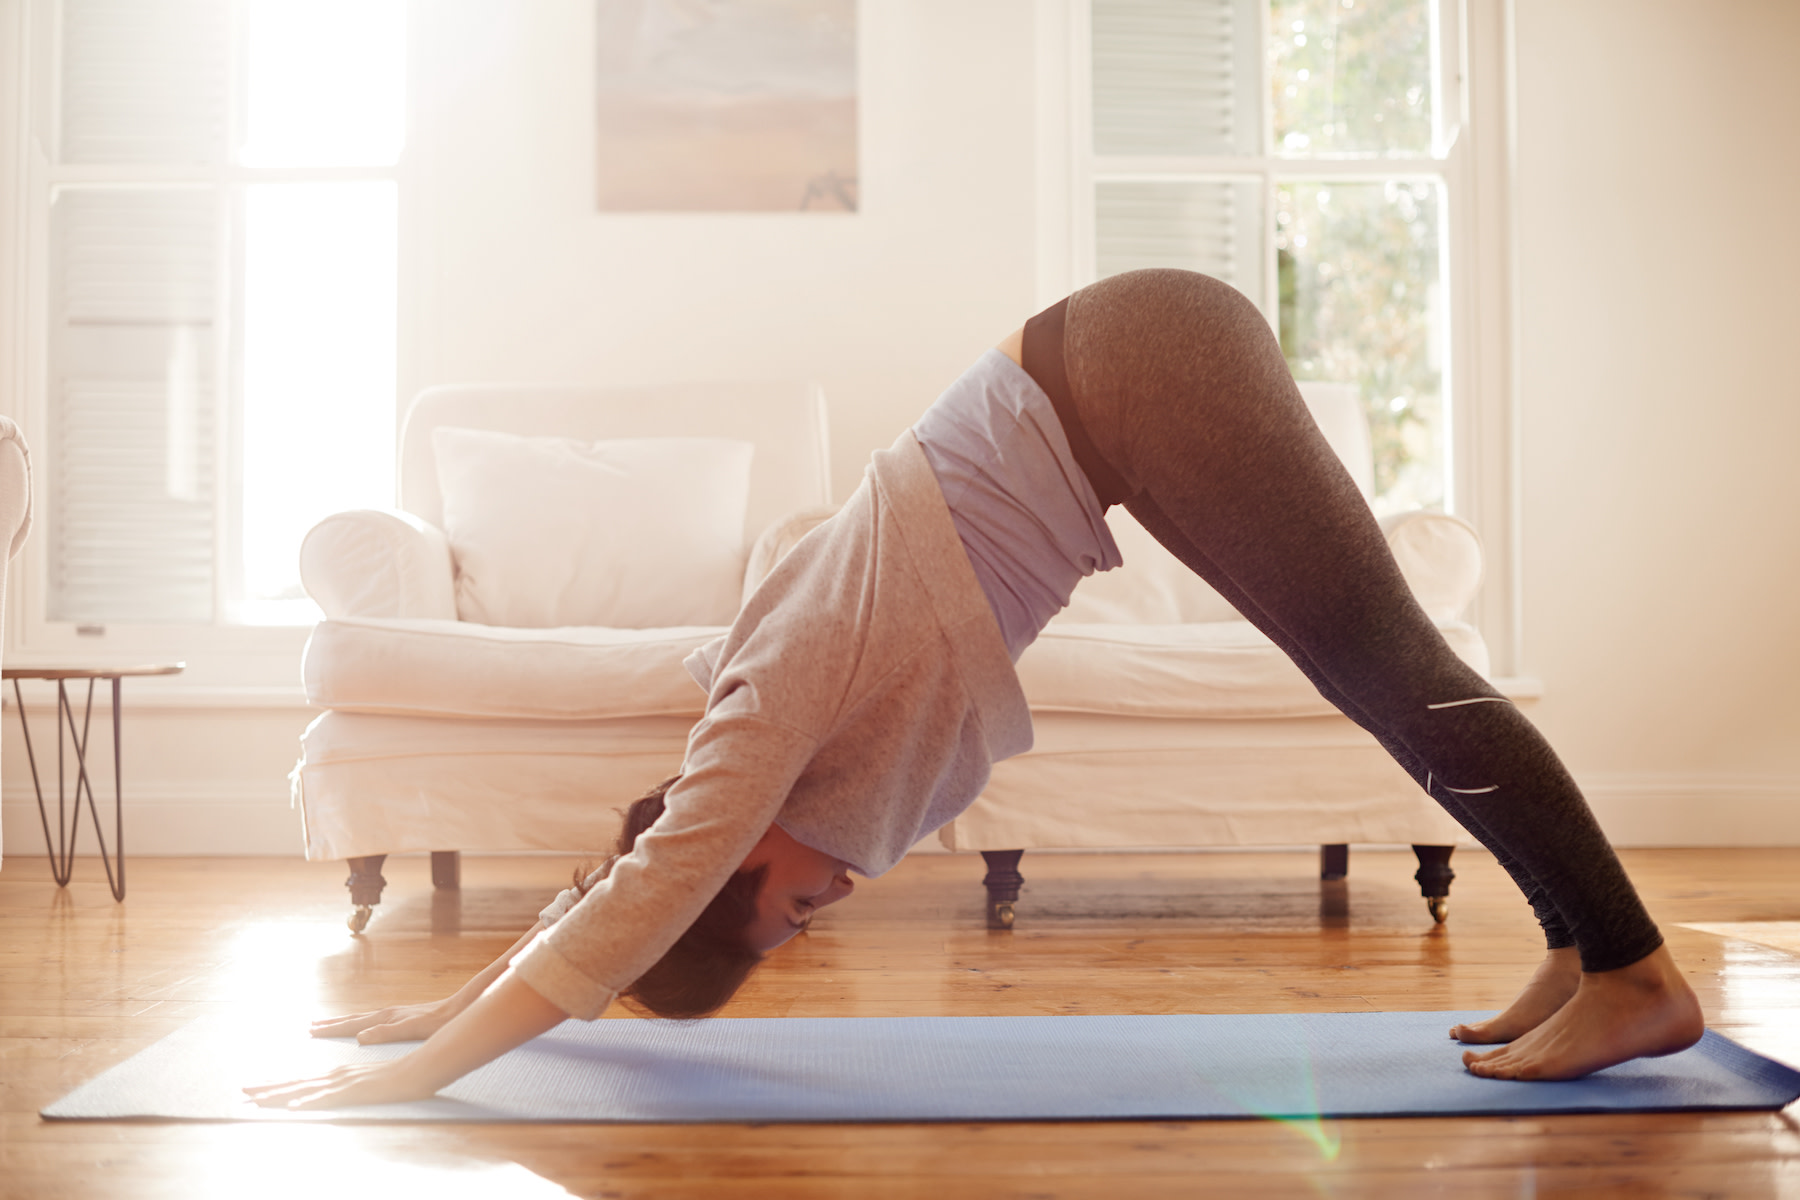
Downward-Facing Dog (Adho Mukha Svanasana) may just be the most famous pose in yoga… or at least among the most recognizable. Repeated through Sun Salutations and countless vinyasa flows, this posture entails forming an inverted V-shape with your body. You’ll look like a dog stretching (hence the name).
Keep reading on to learn about Downward-Facing Dog—including its primary benefits, how to do it properly, and common mistakes.
The Benefits of Downward-Facing Dog
As a forward fold and an inversion, Downward-Facing Dog benefits both your physical and mental health.
Forward folds lengthen your spine and stretch your back body (including your neck, hamstrings, and calves), helping to dissolve tension and reduce stress. “They allow us to look inwards and lean into our own strengths,” says Peloton instructor Denis Morton.
As an inversion, Downward-Facing Dog increases blood flow to your brain. These types of postures offer a challenge—and a subsequent sense of accomplishment. “Inversions allow us to get out of our comfort zone,” Denis says.
Additional benefits of Downward-Facing Dog include:
Boosting strength in your wrists, hands, and fingers
Creating a solid foundation for many other yoga poses, including Crow Pose (Bakasana) and Handstand (Adho Mukha Vrksasana)
“Downward-Facing Dog is an opportunity to use the upper body and lower body against one another to lengthen and strengthen both,” Denis says.
How to Do Downward-Facing Dog
Here, Denis breaks down how to practice Downward-Facing Dog.

Start on all fours with your hands shoulder-width apart and your feet hip-width apart.
Tuck your toes and extend your legs, lifting your hips to make an inverted V-shape.
Bend your knees and lengthen through your entire upper body. Distribute your weight evenly in your hands. Keep an active grip in your fingertips. Try to maintain a solid line of energy from your wrists to the crease of your hips.
Gradually move toward straighter and stronger legs, aiming to get your inner heels closer to the mat.
Hold and breathe through equal inhales and exhales.
Common Mistakes to Avoid
While this pose may seem simple enough, there are quite a few mistakes that Denis sees when cueing Downward-Facing Dog. Here are a few to be mindful of in your practice.
Straightening your legs and rounding your back. Denis says this is one of the most common mistakes he sees with Downward-Facing Dog. Instead of rounding your spine and tucking your tailbone, he suggests trying to use your upper body as a lever to lengthen your lower body—and find the right angle in your hips.
Dumping your weight into your wrists. If you find that your wrists hurt while holding this pose, that’s likely because you’re failing to evenly distribute your front load. “We have a tendency to roll into the base of the wrist and lift our fingertips, but what we really want is to keep our hands active and our fingertips gripping the mat,” Denis says. This small but major tweak will help alleviate wrist pain and allow you to hold this pose for longer and with greater ease.
Caving into your shoulders. A common visual cue is “to avoid wearing your shoulders as earrings,” which essentially means to relax them down. To avoid doing this in Downward-Facing Dog, Denis offers a helpful tip to correct your form. “I urge people to think about spreading their upper arms while drawing their forearms towards one another,” he says. “This may seem counterintuitive, but if you do both in conjunction, it works really well and will give you more room.”
Pushing your heart towards your thighs. This mistake, which creates a bow-like shape rather than an inverted ‘V,’ is most common among flexible practitioners, Denis says. “What you really want is a straight line of energy from your hips to your hands and your hips to your heels,” he adds.
Keeping your feet too wide. You may mistakenly assume your hips are wider than they actually are, which can lead to issues with your foot positioning. Try to understand what a hip-width distance looks like for your body and maintain that spacing in your posture.

Peloton App
Access thousands of classes with no equipment needed.
4 Tips for Nailing Downward-Facing Dog
1. Set Yourself Up for Success
Unsure if you’re doing the posture correctly? If alignment is your biggest concern, start in a Plank Pose to ensure your shoulders are in line with your wrists and your feet are hip-width apart before lifting up into Downward-Facing Dog.
2. Don’t Stress About Your Heels
Contrary to what you may assume, getting your heels to touch the mat isn’t essential in this posture. Instead, focus on pressing your heels toward the mat to stretch the lower half of your back body and avoid shifting your weight too far forward.
3. Focus on Your Body and Ability
Remember: Perfection isn’t the goal. “People tend to think that if they can’t get their heels down or if they shrug their shoulders, they’re doing it wrong,” Denis says. However, doing this pose (or any other yoga posture) to the best of your ability, based on how you’re feeling on any given day, is more than enough. “The more often we do it and the more consciously and actively we engage with it, not only the better the pose gets, but the happier we become with our effort,” he says.
4. Expand Your Perspective
Form and alignment considerations aside, Denis recommends seeing Downward-Facing Dog as something beyond a passive resting pose or a quick transition. “As you start to shift your practice to not [simply] be moving pose to pose, but doing the entire practice as one continuous movement, you start to think about these resting or transitional poses as opportunities for improvement and growth,” he says.
Variations to Downward-Facing Dog
Need some extra support in Downward-Facing Dog or want to try out similar postures that can help refine your strength and alignment? Consider the following variations.
Downward-Facing Dog with Bent Knees
If your hamstrings are tight, it can be difficult to maintain straight legs while keeping your hips high. In this case, keep a slight bend in your knees.
Three-Legged Dog with Hip Circles
Three-Legged Dog follows Downward-Facing Dog in many vinyasa flows, particularly in transitions. (It’s also a great way to open your hips.)
Start in a Downward-Facing Dog.
Lift your right leg up toward the sky. Bend your right knee toward the right wall. Stack your hips.
Make three circles with your knee in a counterclockwise direction, followed by three clockwise circles.
Return to the starting position and repeat on the other side.
Puppy Pose (Uttana Shishosana)
Puppy Pose is a more gentle alternative to Downward-Facing Dog. This posture will open up your shoulders, spine, back, and abs—while also being restorative and grounding (and giving your hamstrings a break).
Start on all fours. Walk your fingers forward until your forehead rests on the mat. Keep your hips stacked above your knees.
If desired, go deeper into the pose by lowering your chest and arms onto the mat. If it’s comfortable for your neck, you can also rest your chin on the mat for a deeper stretch.
Hold and breathe through equal inhales and exhales.
This content is for informational and educational purposes only and does not constitute individualized advice. It is not intended to replace professional medical evaluation, diagnosis, or treatment. Seek the advice of your physician for questions you may have regarding your health or a medical condition. If you are having a medical emergency, call your physician or 911 immediately.
Want to strengthen your yoga practice?
We can help. Enter your email to get articles, instructor tips, and updates from Peloton sent to your inbox.
By providing your email address, you agree to receive marketing communications from Peloton.
For more about how we use your information, see our Privacy Policy.


