The Dumbbell Row Never Gets Old with These 7 Variations
Rows are anything but boring when you try these upgrades.
By Pam Moore•
What Muscles Do Dumbbell Rows Work?
How to Do the Standard Dumbbell Row
The 5 Best Dumbbell Row Variations
Tips for Doing Dumbbell Rows and Its Variations
Dumbbell rows are a staple fitness move that you’ll find in all kinds of classes—from traditional strength training to barre. Wondering why dumbbell row variations keep showing up in your workouts? Trust us, it’s not because your fitness instructors are just trying to find something to fill the time; we need rows not just to strengthen our backs, shoulders, and biceps, but more importantly, to promote good posture.
“We spend so much of our day reaching forward. Whether that’s driving, typing, texting, or cooking, nearly everything we do is in front of us,” says Peloton instructor Katie Wang. If we’re not careful, when we’re busy living our lives, our upper backs are rounding, our shoulders are internally rotating, and our necks are jutting forward, causing our pectoral muscles to shorten. Over time, those imbalances can lead to chronic neck pain and headaches and can set us up for injuries.
Enter dumbbell rows. “Rows give us an opportunity to work the muscles that are so often ignored. What’s more, when we strengthen those muscles and learn to engage them, we can counteract the effects of our lifestyle to encourage a lifetime of good posture,” says Katie. “I love this move because it works several muscle groups at once and it’s functional. There’s so much carryover, not just to sports like rowing and running, but also to everyday life,” she explains.
The good news is, there’s no shortage of ways you can mix up the way you do your rows to keep them interesting. While the move may seem basic, it’s anything but when you start to try dumbbell row variations. Keep reading to find out which ones we love and how to do them correctly.
What Muscles Do Dumbbell Rows Work?
“Dumbbell rows are a great compound upper body workout that primarily helps strengthen your back muscles,” says Katie. But that’s not all. They also work part of your shoulders, and to a small degree, your core and biceps. Here’s a more in-depth look at which muscles are engaged during a dumbbell row.
Latissimus Dorsi: Also known as your lats, the latissimus dorsi are the large muscles that extend down the sides of your back. (Swimmers tend to have especially strong lats, as these are the muscles largely responsible for propelling you through the water.)
Rhomboids: Located between your shoulder blades, your rhomboids are the primary muscles responsible for retracting your scapulae, or shoulder blades. If your fitness instructor or trainer has ever encouraged you to pinch your shoulder blades down and back or to move as if you were trying to pinch a pencil between your shoulder blades, they were trying to get you to retract your scapulae.
Trapezius: A large muscle covering your upper back, the trapezius’ main role is to support your arms and shoulders and to rotate and move your scapula.
Erector Spinae: These muscles travel the length of your spine and help you stand upright. While they’re not a prime mover during a row, they play an important part in helping to stabilize your spine as you engage your upper back to perform a row.
Posterior Deltoids: Like the erector spinae, the posterior deltoids aren’t a primary mover in the row, but they do help the lats and traps do their jobs during a row. Located at the back of your shoulder, extending from the back of your shoulder blade to your humerus (upper arm bone), they help to externally rotate your shoulder.
Biceps Brachii: While rows aren’t the best way to target your biceps, the biceps do engage as you pull your shoulder up and back.
Core: While you might not light your core on fire during a dumbbell row, you do need to engage your abdominal stabilizer muscles to ensure that the movement is coming from your upper back and shoulders as you keep your lower back, core, and hips stable throughout the movement.
How to Do the Standard Dumbbell Row
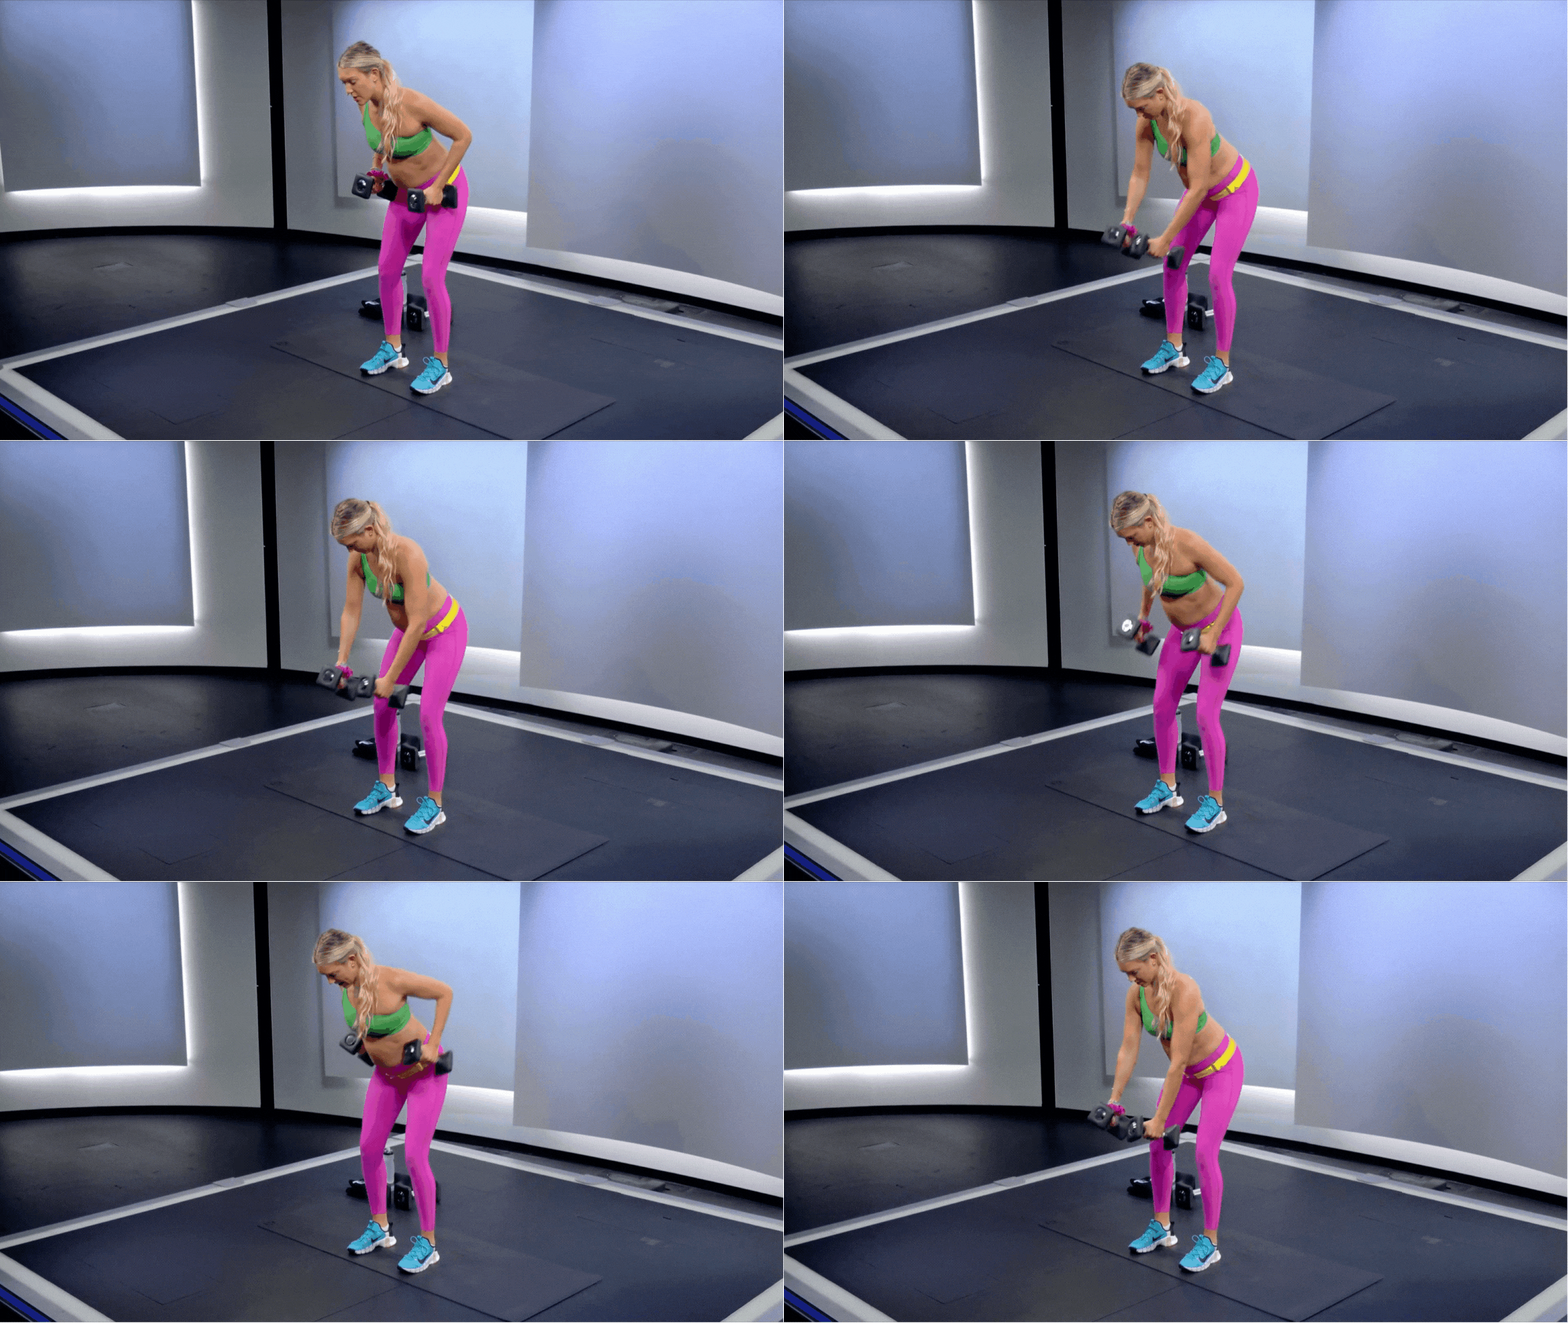
To do a basic dumbbell row, also sometimes called a bent-over dumbbell row, you just need a pair of dumbbells. Here’s what to do with them:
Holding a dumbbell in each hand with your arms relaxed by your sides, stand with your feet shoulder-width apart.
Hinge at your hips to create a 60-degree angle. Keep your back flat and your core engaged.
Pull the dumbbells up and back, squeezing your shoulder blades together and keeping your elbows tucked in close to your body.
Lower the dumbbells back down with control.
The 5 Best Dumbbell Row Variations
Once you’ve mastered the standard dumbbell row, you can start incorporating different versions to keep your workouts fresh. Believe us, there are way too many dumbbell row variations to ever get tired of it. You can try different body positions or even different grips to spice things up.
“While a neutral grip row will target your lats, simply adjusting the grip can help target different parts of the back/upper body. A wide row will help target those upper back muscles,” says Katie. And if you’re looking for maximum efficiency, look no farther than a set of renegade rows or bear plank rows to light up your back, shoulders, and core, says Katie.
Here are five ways to spice up your rows, including step-by-step instructions.
1. Single Arm Row
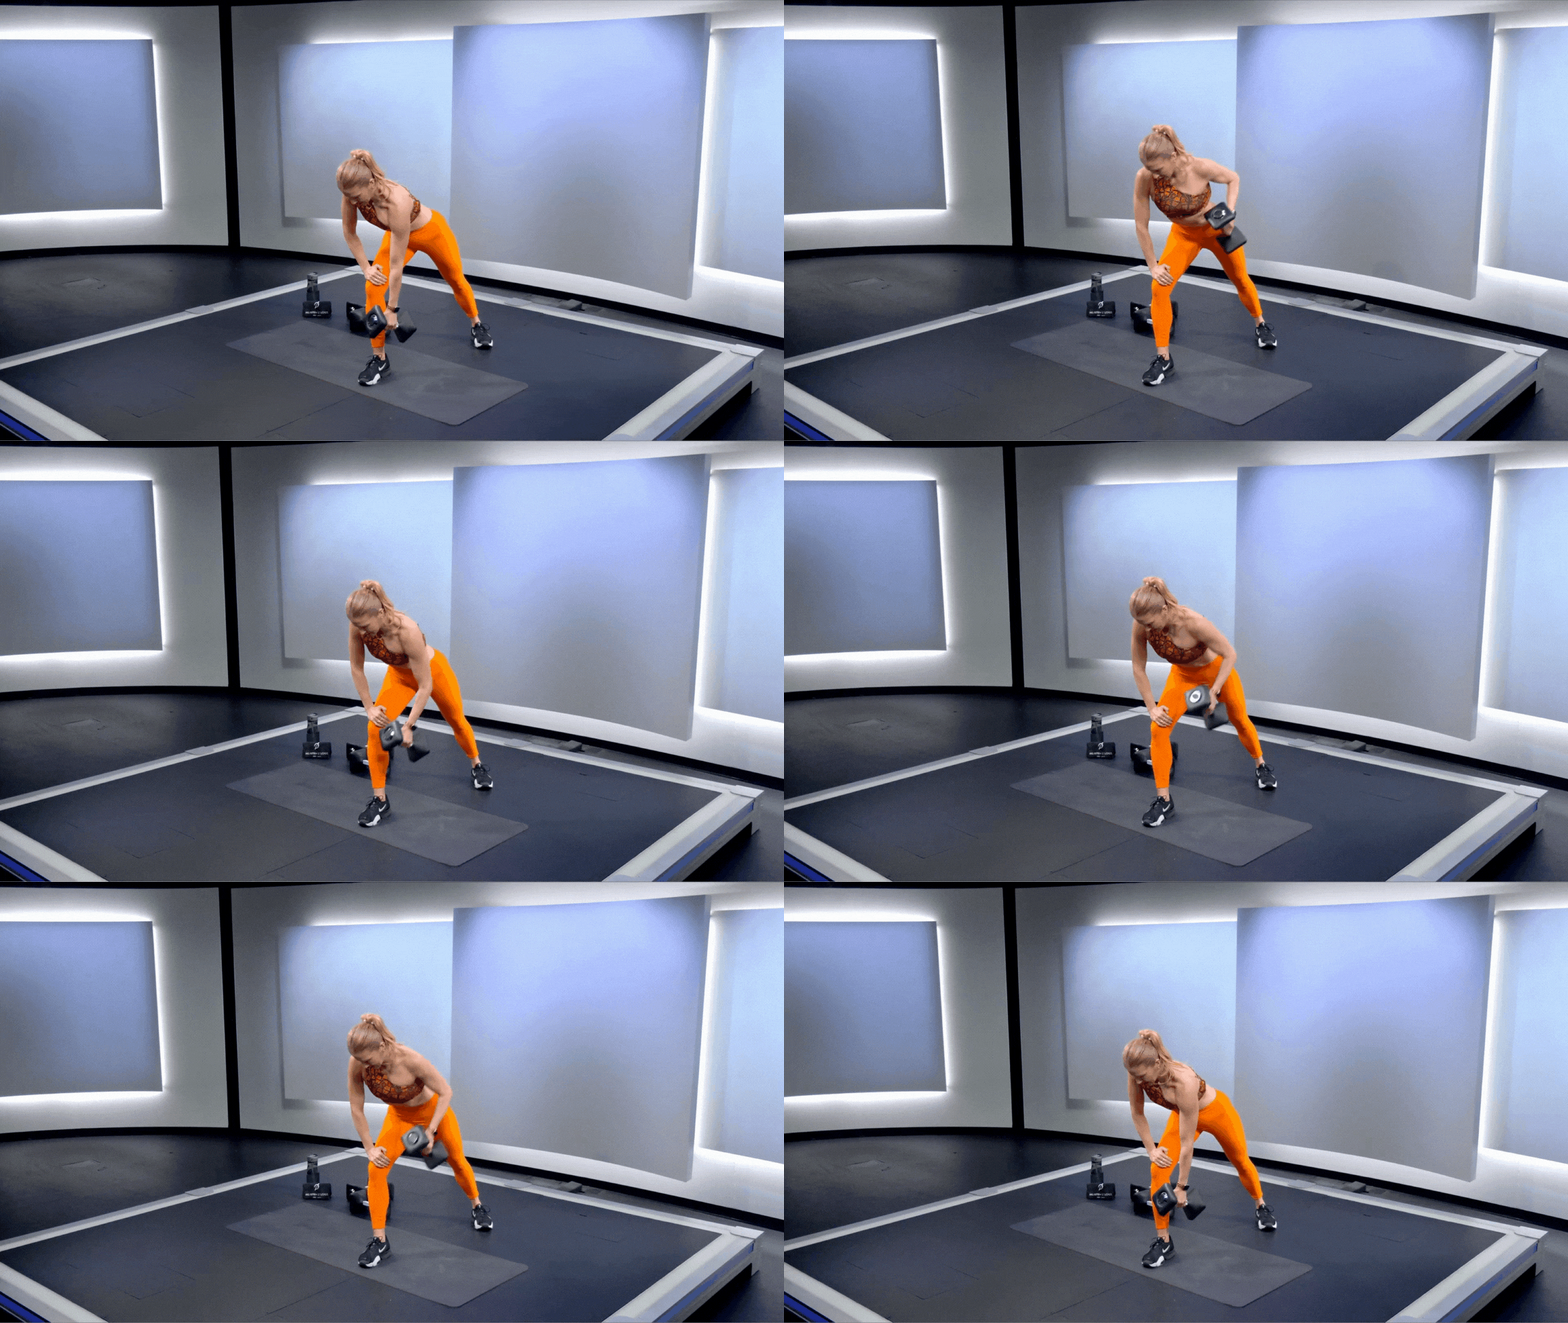
Harder than a standard row, the single-arm row, also called the lawn mower row, challenges your balance and core strength. It can be done with or without a weight bench. If you’re not using a bench, you will start holding a dumbbell in one hand and step the same side leg back into a lunge. Place your free hand on your knee instead of a bench.
Stand with your body perpendicular to your bench, and place a dumbbell on the floor on the side opposite the bench.
Place your free hand and your same-side knee on the bench while your opposite foot is planted on the floor and your free hand is relaxed at your side.
Keeping your back flat and your core braced, reach down and grasp the dumbbell.
With the dumbbell in your hand, pull your elbow up and back while keeping your arm tucked in close to your body, as if you were aiming to skim your pants pocket with your hand and keep your shoulder blades retracted.
With control, extend your arm back down and repeat.
Switch sides and repeat.
2. Renegade Row
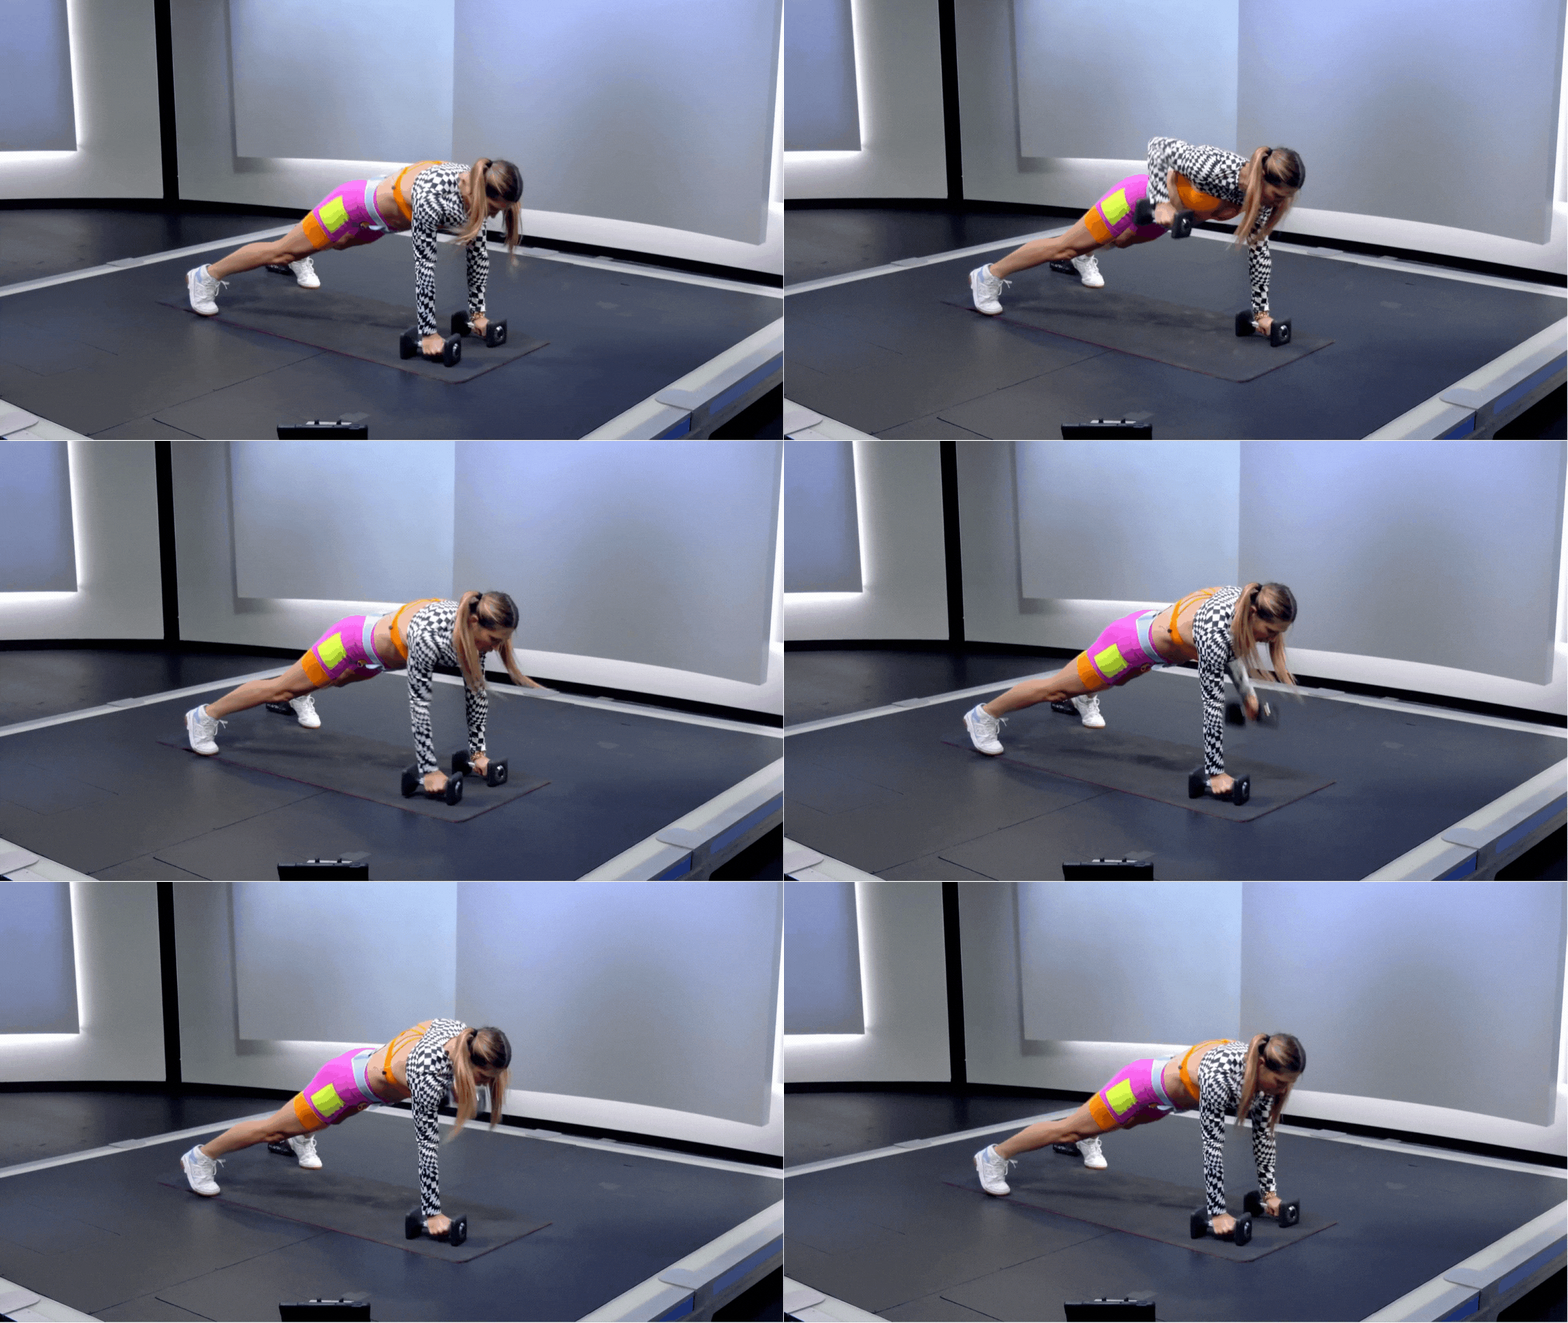
Add renegade rows to your repertoire only once you’ve mastered the basic row—as long as you’re looking for a real challenge. This move targets not just your lats, rhomboids, and traps, but also your core and shoulders while challenging your balance. If you’re pressed for time, this move packs a lot of punch.
Start in a plank position with a dumbbell in each hand.
Row one dumbbell up to your chest while stabilizing with the other arm. Be careful to keep your hips level. If you’re unable to do this movement without rotating your hips, try widening your feet and/or using a lighter weight.
Lower the dumbbell back to the ground and alternate sides.
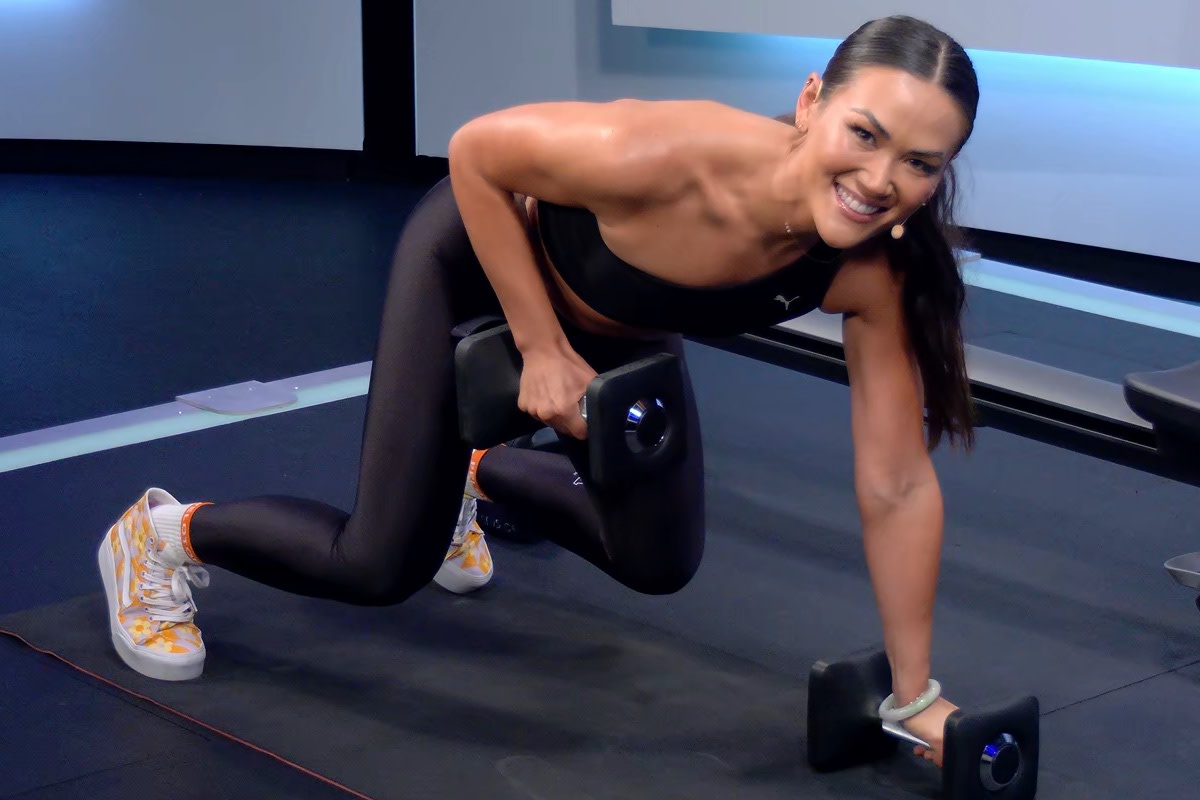
3. Bear Plank Row
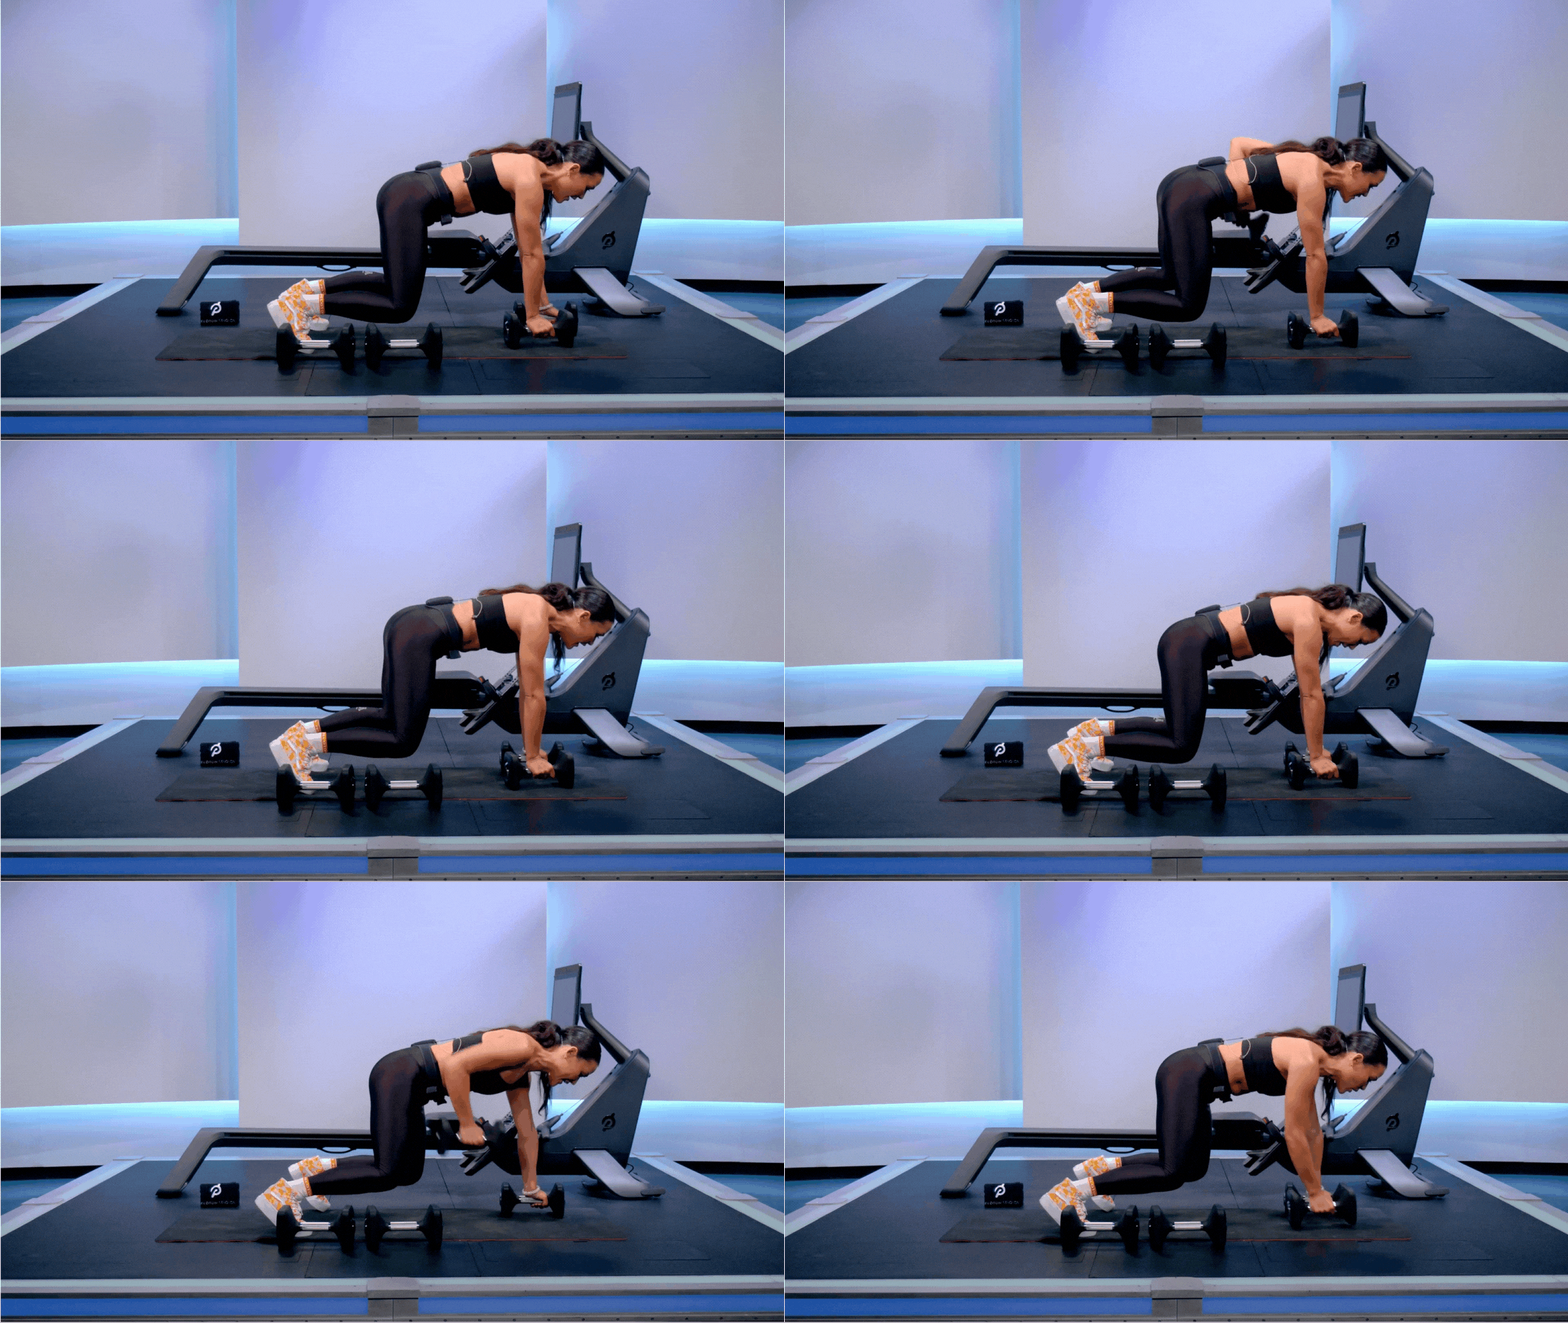
A standard bear plank challenges several muscle groups, including your shoulders, core, glutes, hips, and triceps. Add a row to the mix and this is a true total body movement that also functions as an anti-rotation exercise. In other words, you’re challenging your core to remain stable while you exert force through your upper body, a move designed to build functional fitness.
Take a pair of dumbbells and place them on the floor in front of you.
Get down on your hands and knees with your hands resting on your dumbbells.
Keep your hands directly beneath your shoulders and your knees directly beneath your hips. Maintain a flat back, with no arching or rounding.
Engaging your core and glutes, raise your knees up off the floor by a few inches so that your shins are parallel to the floor and your weight is resting on your toes.
Row one weight up and back, keeping your shoulder blades retracted and your hips level.
Return your weight to the starting position and repeat the same movement for the opposite arm.
4. Wide Grip Dumbbell Row
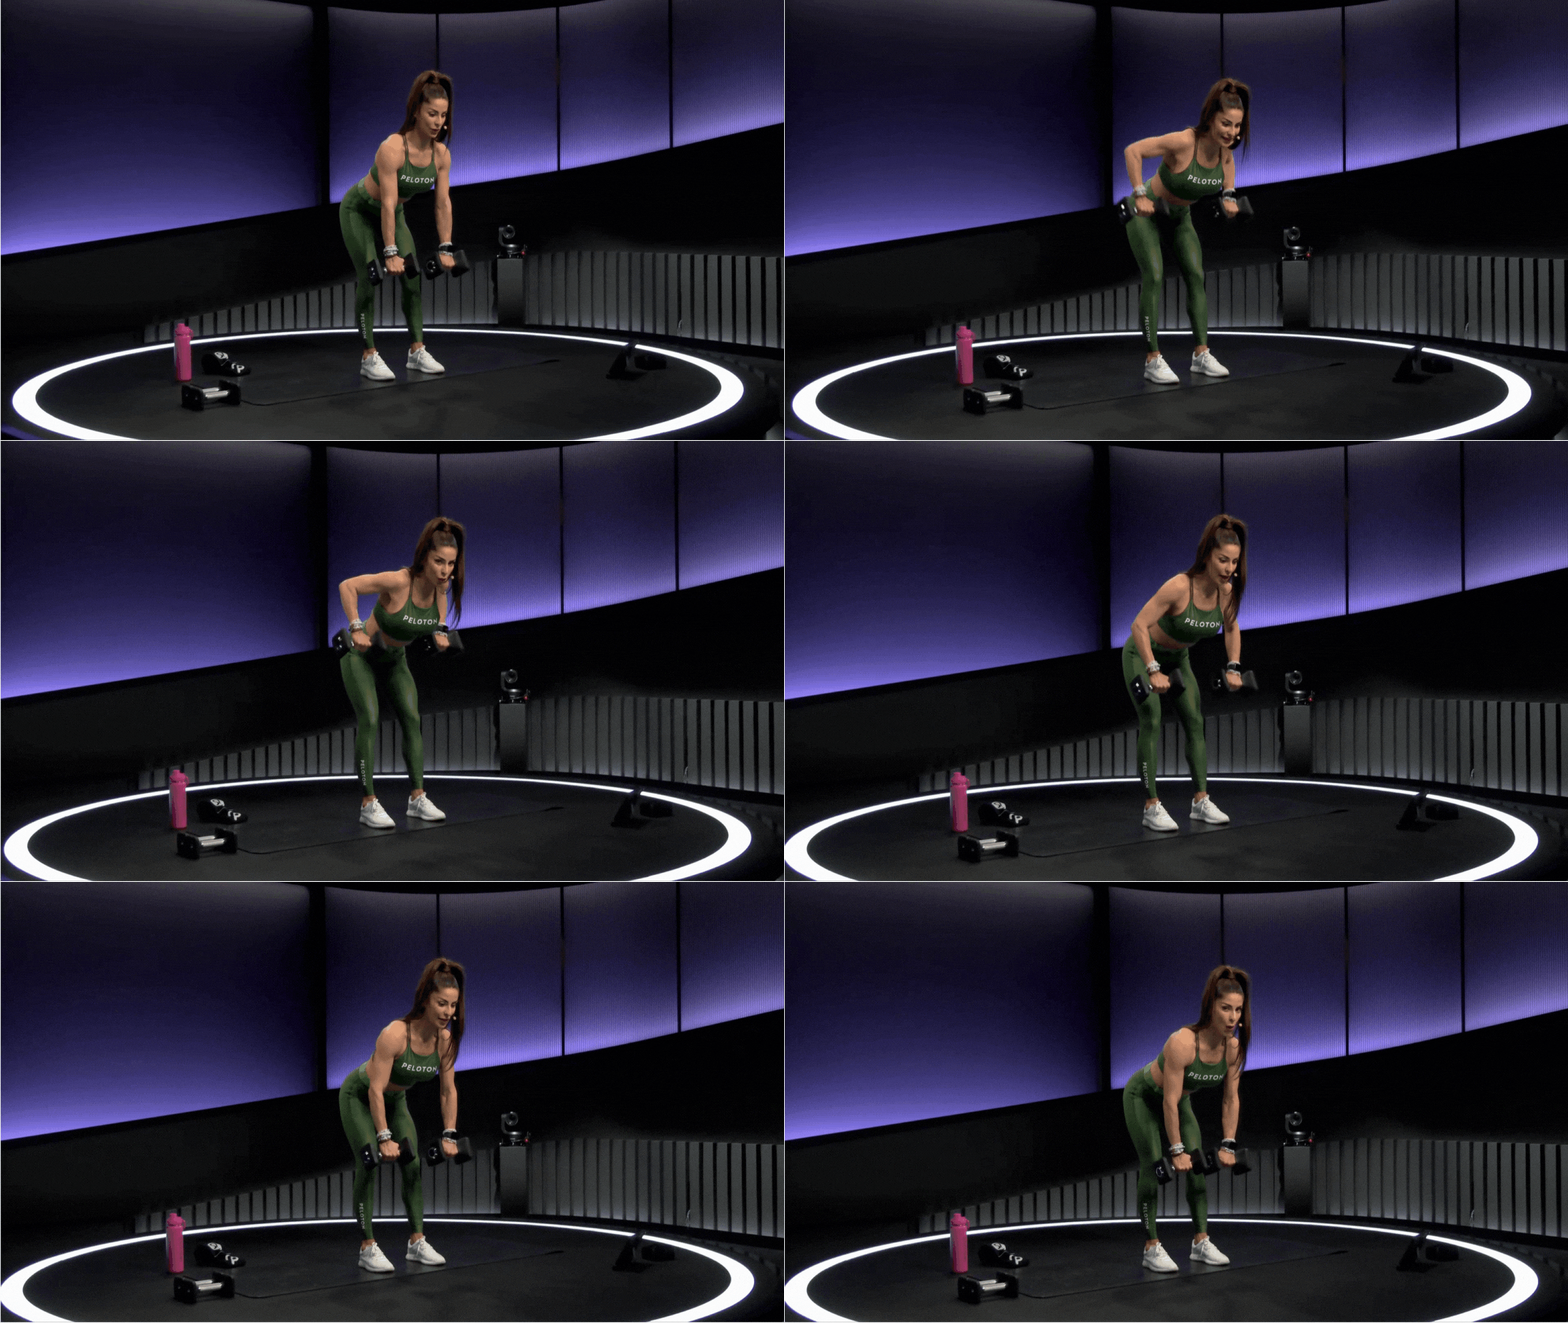
This exercise primarily targets your upper back and shoulders as compared to the closed grip, or standard, dumbbell row, which hits more of your middle back, or lats.
Stand with your feet hip-width apart, dumbbells at your sides with palms facing in.
Hinge at your hips to create a 60-degree angle. Keep your back flat and your core engaged.
With your arms straight and dumbbells directly under your shoulders, bring your elbows out and up, as dumbbells come towards your chest.
Lower the dumbbells back down with control.
5. Reverse Grip Dumbbell Row

While reverse grip rows work all the same muscles as the other row variations, they demand a bit more from your biceps and your lats. Incorporate this move into your routine if you’re going for hypertrophy and looking for more ways to work the same muscle groups, you’re targeting your grip strength, or just looking for something different.
Instead of grasping the dumbbells in a neutral overhand grip, use an underhand grip, so that your palms are facing up.
Start with a dumbbell in each hand with your arms relaxed by your sides, feet shoulder-width apart.
Hinge at your hips to create a 60-degree angle. Keep your back flat and your core engaged.
Pull the dumbbells up and back, squeezing your shoulder blades together and keeping your elbows tucked in close to your body.
Lower the dumbbells back down with control.
6. Upright Row
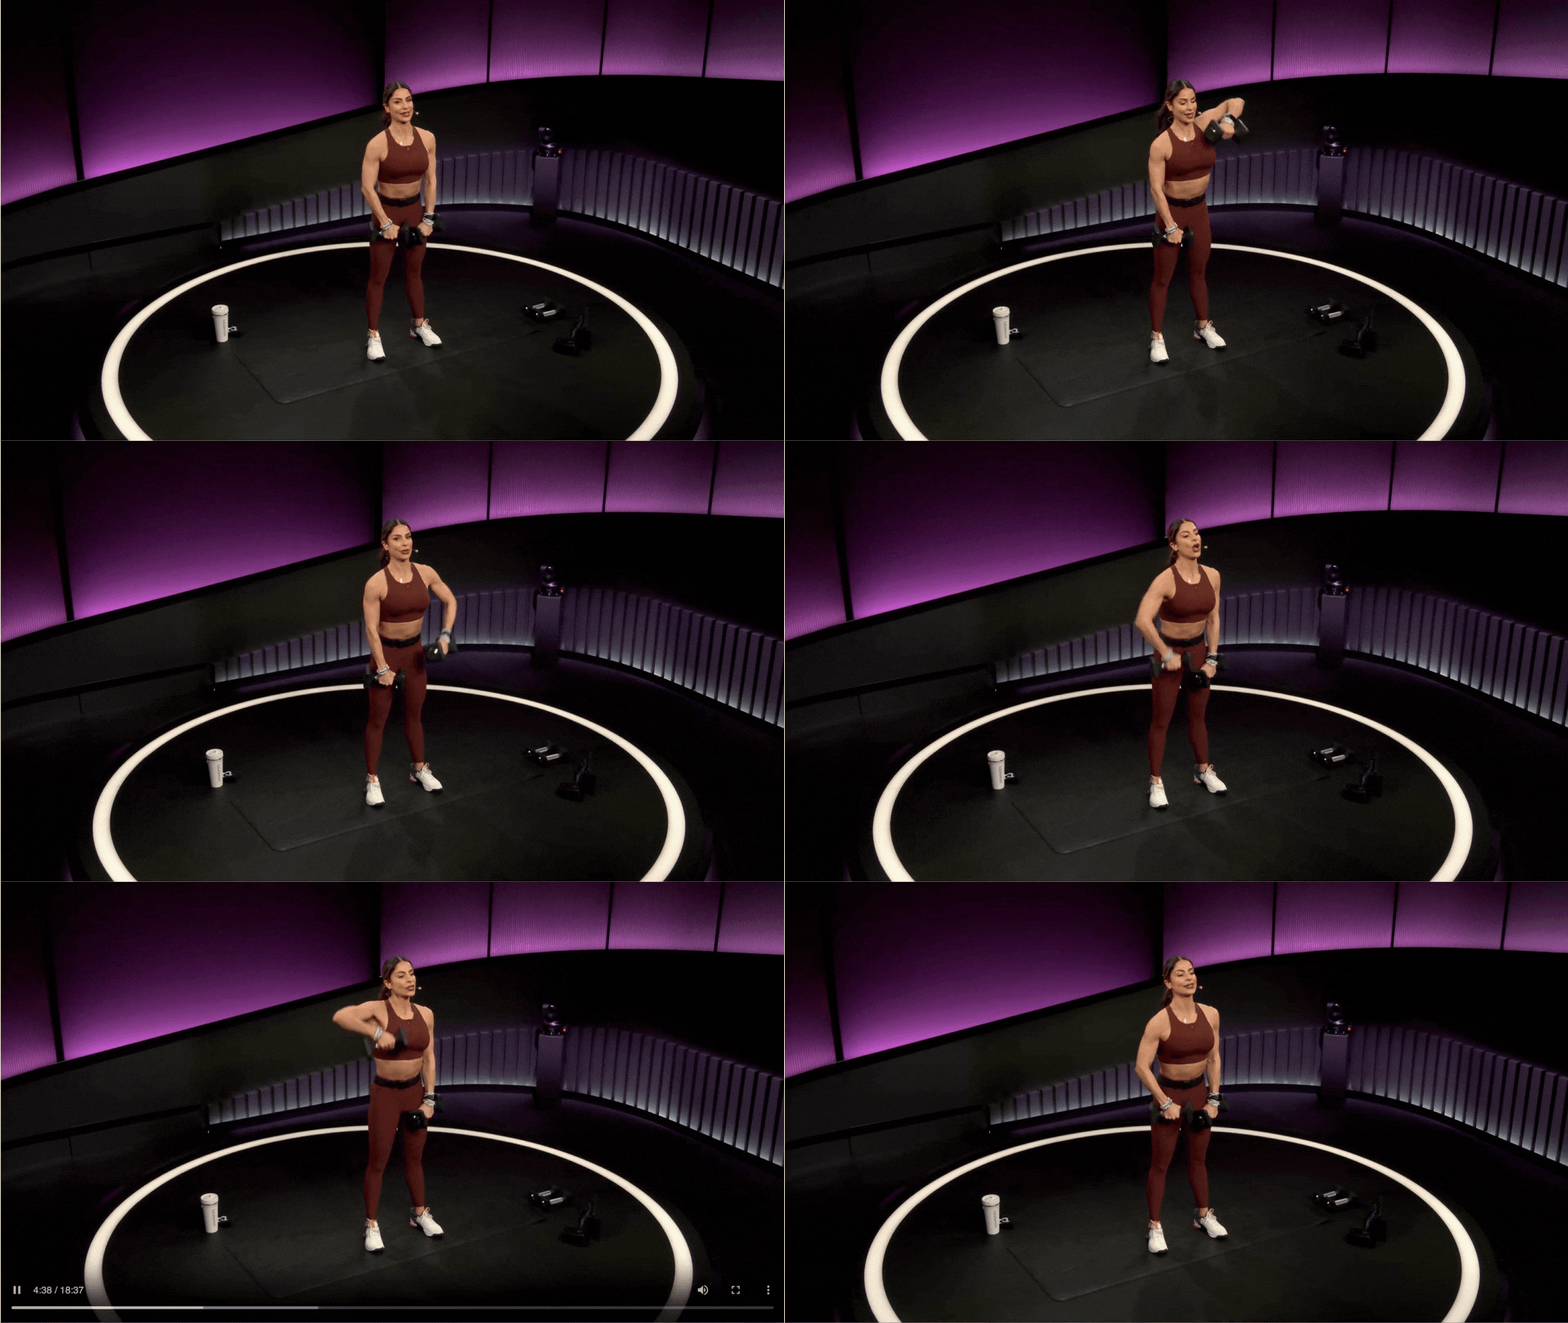
If you’re primarily looking to work your shoulders, the upright row is a solid variation to add. While it hits the biceps and mid-back to an extent, you’ll mostly work on your deltoids and upper traps.
Stand with your feet hip-width apart, holding the dumbbells with your palms facing your body.
Lift the weights up to shoulder height in front of your torso, keeping elbows wide.
Lower the dumbbells back down with control.
7. Chest-Supported Dumbbell Row
This is a good option if you’re having trouble bracing your core and lower back while doing other versions of the dumbbell row, as the bench gives you some support.
Adjust your weight bench so that the seat angle is at a 45-degree angle.
Stand with dumbbells in your hands with your arms relaxed at your sides.
Straddle the bench so that your feet are planted about shoulder width apart and your chest is resting against the back of the seat while your neck, upper chest, and face are exposed.
Taking care to retract your shoulder blades, row the dumbbells back toward your nipple line
Tips for Doing Dumbbell Rows and Its Variations
When done correctly, dumbbell rows work multiple muscle groups, including your back, biceps, and core, and over time, help you become stronger and improve your posture. But if you approach your rows with poor form, at best, you won’t optimize the exercise, and at worst, you’re risking injury. To make sure you’re doing them correctly, here are some do’s and don’t’s.
Don’t Skip Your Warm-up
“Warming up not only decreases your risk of injury, it also helps to get you mentally prepared to work your muscles,” says Katie. Your warm-up could be anything that gets your heart rate up for at least three minutes, including a brisk walk, jog, or a few sets of jumping jacks. The goal is to get your blood circulating and engage your muscles without creating fatigue. The heavier your weights are, the more important it is to warm up.
In addition to your full-body warm-up, it’s a good idea to perform at least one or two warm-up sets before you pick up the weights you plan to use for your workout. Your warm-up set should consist of five to 12 repetitions of a dumbbell row using a relatively light weight to establish proper form and to engage the muscles that are about to work hard.
Don’t Arch or Round Your Back
“You want to maintain a neutral spine throughout the exercise. Arching or rounding your back typically means you’re not engaging your core,” says Katie. This is a problem because if your back isn’t flat and stable, you’re putting unwanted pressure on your spine, which could lead to low back pain or injury. To make sure your spine is in alignment and your core is engaged, visualize yourself pulling your navel in toward your spine throughout the movement. If possible, catch a side view of yourself in the mirror to make sure your back and neck are in alignment.
Do Keep Your Neck Aligned With Your Spine
Good form for dumbbell rows requires you to keep your neck in a neutral position, in alignment with your spine. In other words, you shouldn’t be looking up or down. Rather, your gaze should be focused straight ahead.
Don’t Let Your Biceps Take Over
No matter which row variation you’re doing, you should feel the burn primarily in your upper back and shoulders—not your biceps. As we mentioned before, during a row, your biceps do some of the work, but not nearly as much as your rhomboids, traps, and lats. If it doesn’t feel like you’re fully engaging your upper back and shoulder muscles, try retracting your shoulder blades before you even begin the movement and/or choosing a lighter weight. “Don’t go too heavy,” suggests Katie. “it’s better to have proper form and muscle engagement than to grab the heaviest weight.”

Peloton App
Access thousands of classes with no equipment needed.
This content is for informational and educational purposes only and does not constitute individualized advice. It is not intended to replace professional medical evaluation, diagnosis, or treatment. Seek the advice of your physician for questions you may have regarding your health or a medical condition. If you are having a medical emergency, call your physician or 911 immediately.
Level up your inbox.
Subscribe for a weekly dose of fitness, plus the latest promos, launches, and events.
By providing your email address, you agree to receive marketing communications from Peloton.
For more about how we use your information, see our Privacy Policy.
