What Is Yin Yoga?
What Are the Benefits of Practicing Yin Yoga?
10 Essential Yin Yoga Poses
Is Yin Yoga Good for Beginners?
How to Integrate Yin Yoga Into Your Routine
The Takeaway

If you’re at all familiar with yoga, you know there are tons of different types. One of our favorites is Yin Yoga, a slow-paced, restorative style that challenges you to hold single poses for long periods of time and allow yourself to really sink into them. As you can imagine, it’s a fantastic way to flush tension out of your body, relieve stress, and tap into your focus.
Here, we explore the benefits of doing Yin Yoga poses and share 10 of Peloton instructor Denis Morton’s favorite asanas to help you get started.
What Is Yin Yoga?
Stemming from ancient Chinese Taoist philosophies and traditions, Yin Yoga is a type of yoga that focuses on being at one with your surroundings and in harmony with your personal nature. While practicing Yin Yoga, you hold single poses for a minimum of three minutes to stretch and lengthen your muscles and deep connective tissues (aka your ligaments, joints, and bones).
Because your body remains so still, Yin Yoga has a substantial inward focus. As you breathe in and out, you create space to tune into your thoughts and pay attention to sensations throughout your body.

Peloton App
Access thousands of classes with no equipment needed.
Why Do You Hold Yin Yoga Poses for So Long?
For starters, connective tissue responds well to a slow, steady load, so remaining still in a single posture for a sustained period of time is what makes Yin Yoga so effective at relieving tension and stretching your body.
At first glance, many Yin Yoga poses look simple, but when you hold them for a long time, they deeply challenge your flexibility and mental strength. And since it’s more of a passive practice, you won’t be shaking and sweating as much as you would be in, say, a Vinyasa or power yoga class.
Traditionally, this form of yoga is believed to move “chi,” or life force energy, throughout your body. Another reason poses are held for so long in Yin Yoga is to help move that energy throughout the body and break up any harmful buildup. Usually, that happens with hip-opening poses.
How Are Yin Yoga Poses Different From Restorative Yoga Poses?
Yin Yoga and restorative yoga are both slow-paced and relatively passive types of movement, but they’re not the same. “The functional difference is that in restorative yoga, what we're looking for is about a one or two on an intensity scale of 10, or rate of perceived exertion.” Denis says. “I call restorative yoga ‘organized napping.’ And Yin Yoga is more of a four out of 10 in terms of intensity. It is much more active and much more engaged in that way.”
Expect to feel engagement and activation in a Yin Yoga class, whereas you’re completely relaxed in a restorative yoga session.


What Are the Benefits of Practicing Yin Yoga?
Like other types of yoga, Yin Yoga boasts a wide range of physical and mental benefits. If you practice it consistently, here are some of the major upsides it could bring you.
More breath awareness: Focusing on your breath is paramount in Yin Yoga because it draws your attention away from any discomfort you feel while holding poses. You do a lot of “breathing through it,” expanding your ribs and belly on each inhale and pulling your navel to your spine on each exhale. That attention to your breath can benefit you off the mat.
More flexible joints: Like other types of yoga, Yin Yoga can increase flexibility and improve your range of motion. As you sink into Yin Yoga poses, your fascia, or connective tissues, become more elastic as tension gets released. Your joints also become more mobile, which improves your range of motion.
Boosted blood circulation: The focus on breathing in Yin Yoga means oxygen pumps freely into your body, boosting blood flow and circulation. Studies have specifically found that yoga increases both blood flow and red blood cell count, allowing more oxygen to reach your cells.
Deeper relaxation: Deep breathing and relaxation activate your parasympathetic nervous system, which signals to your brain that you’re safe. Perhaps consider practicing Yin Yoga poses at the end of the day to help you unwind, relax, and prepare for sleep.
Improved mental and physical health: Studies have shown that Yin Yoga could limit the adverse health effects of high stress. “The amount of time that you spend in the poses really allows you to find a different sense of calm and relationship with the poses, because we're in them for such long durations,” Denis says. “You almost have to reconcile with how deep you're willing to go and how long you can sustain that. The surrender and acceptance can lead to a deeper relationship with yourself and with the poses.”
10 Essential Yin Yoga Poses
With Denis’ help, we’ve listed 10 Yin Yoga poses you can practice regardless of your experience level. You might notice that a lot of these Yin Yoga poses feel similar to asanas you’ve done in a Vinyasa or Hatha class. “Hatha Yoga comes from India and Yin Yoga is based on Traditional Chinese Medicine principles,” Denis says. “In order to delineate between those two, we've named the poses differently. So Pigeon Pose in Hatha yoga is called Sleeping Swan in Yin Yoga. Just in making the names different, we recognize the difference in approach.”
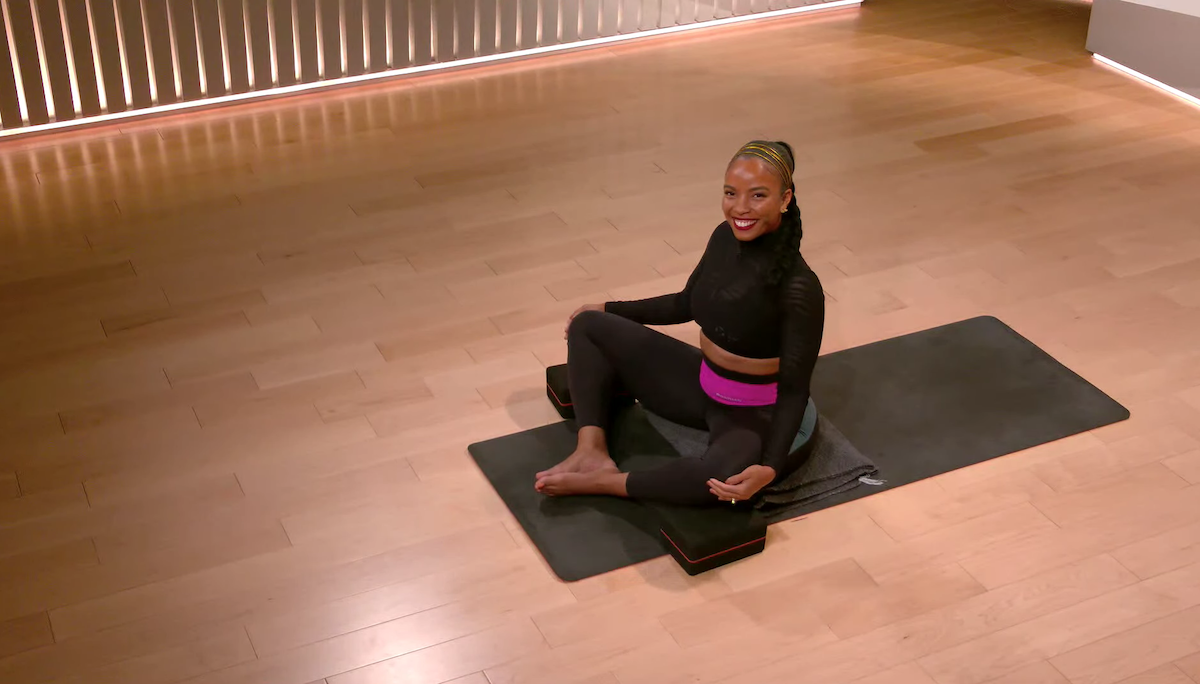
1. Butterfly Pose (Baddha Konasana)
Butterfly Pose is an accessible, beginner-friendly Yin Yoga pose. Want to make it more comfortable? Add yoga blocks under each knee or underneath your forehead for extra support.
Begin in a seated position with the soles of your feet pressed together.
Hinge forward at your hips. Let your spine relax and round as you press your forehead toward your feet, allowing gravity to pull your upper body down.
Hold this position for three to five minutes.
Muscles worked: Spine, inner thighs, hamstrings, hips
2. Caterpillar Pose (Paschimottanasana)
A seated forward fold, Caterpillar Pose can be surprisingly difficult to hold. To make this pose more comfortable, sit on a folded blanket or cushion.
Begin in a seated position with your legs extended straight in front of you.
Fold forward from your hips, letting your spine round and relax. Keep your legs and feet relaxed. You should start feeling gentle sensations along your spine and hamstrings.
Hold this position for three to five minutes.
Muscles worked: Spine, hamstrings
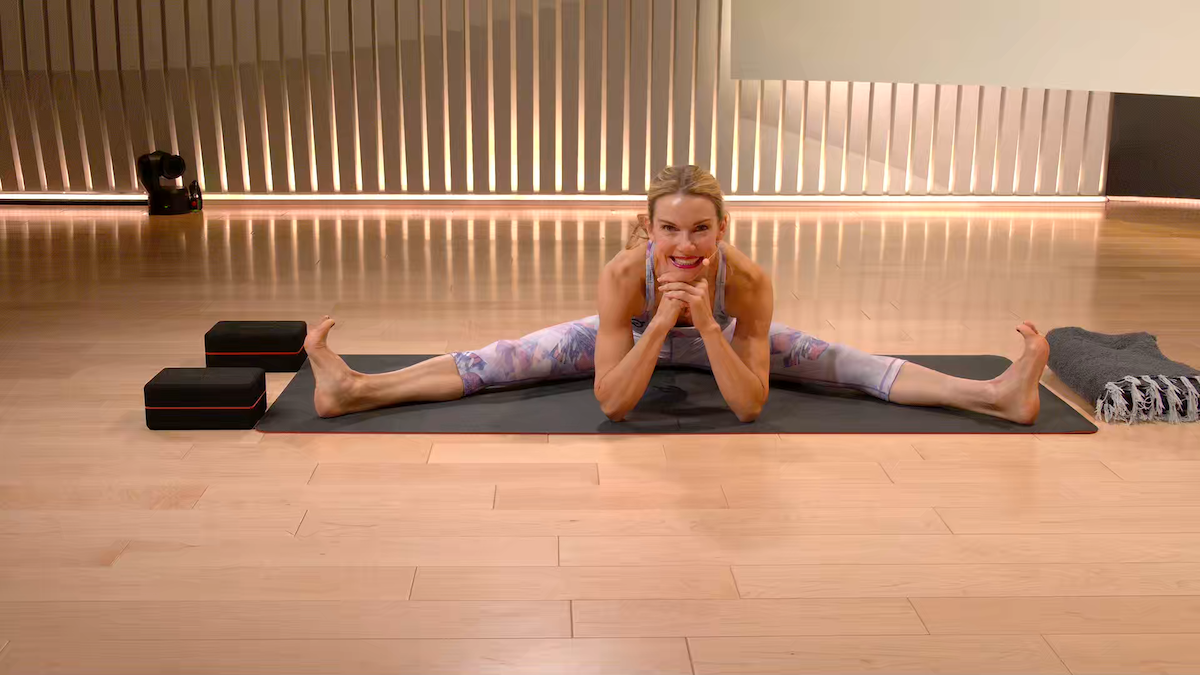
3. Dragonfly Pose (Maksikanagasana)
Because Dragonfly Pose is a seated straddle pose, it’s great for gently stretching your inner thighs. Add stacked blocks underneath your chest or forehead to get into full relaxation mode.
Begin in a seated position.
Spread your legs so they’re outstretched widely on either side of your torso.
Gently hinge forward from your hips, rounding your spine and relaxing your neck as you reach your hands out on the floor in front of you. You should start feeling gentle sensations down your spine and inner thighs.
Hold this position for three to five minutes.
Muscles worked: Inner thighs, hamstrings, spine, hips
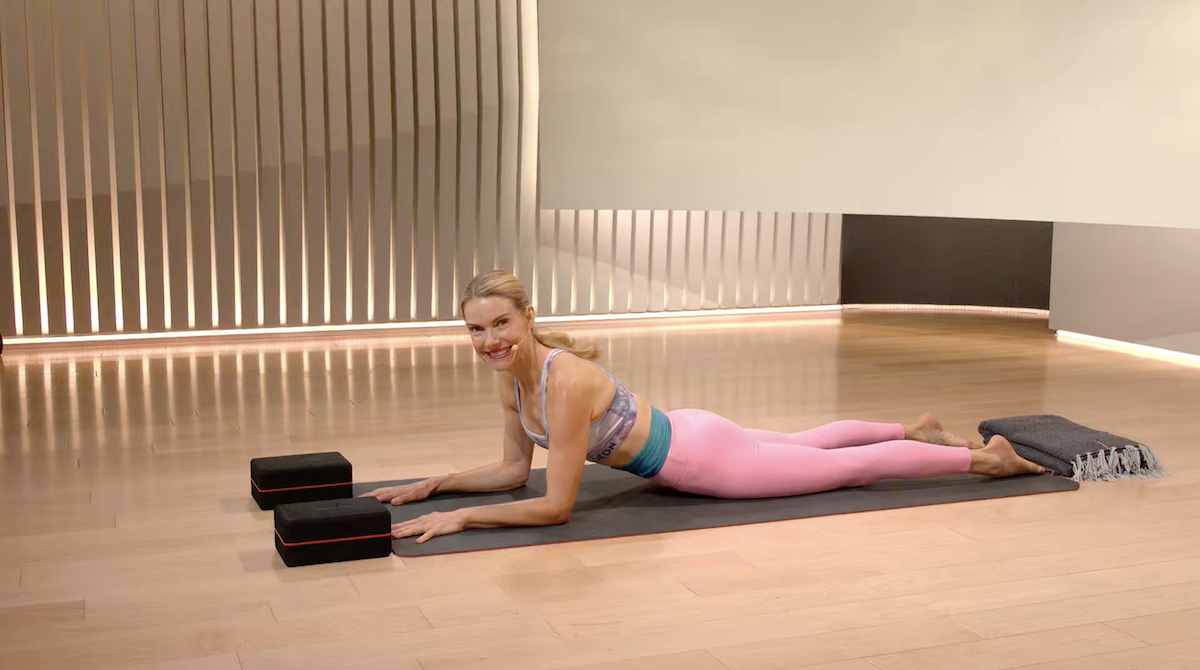
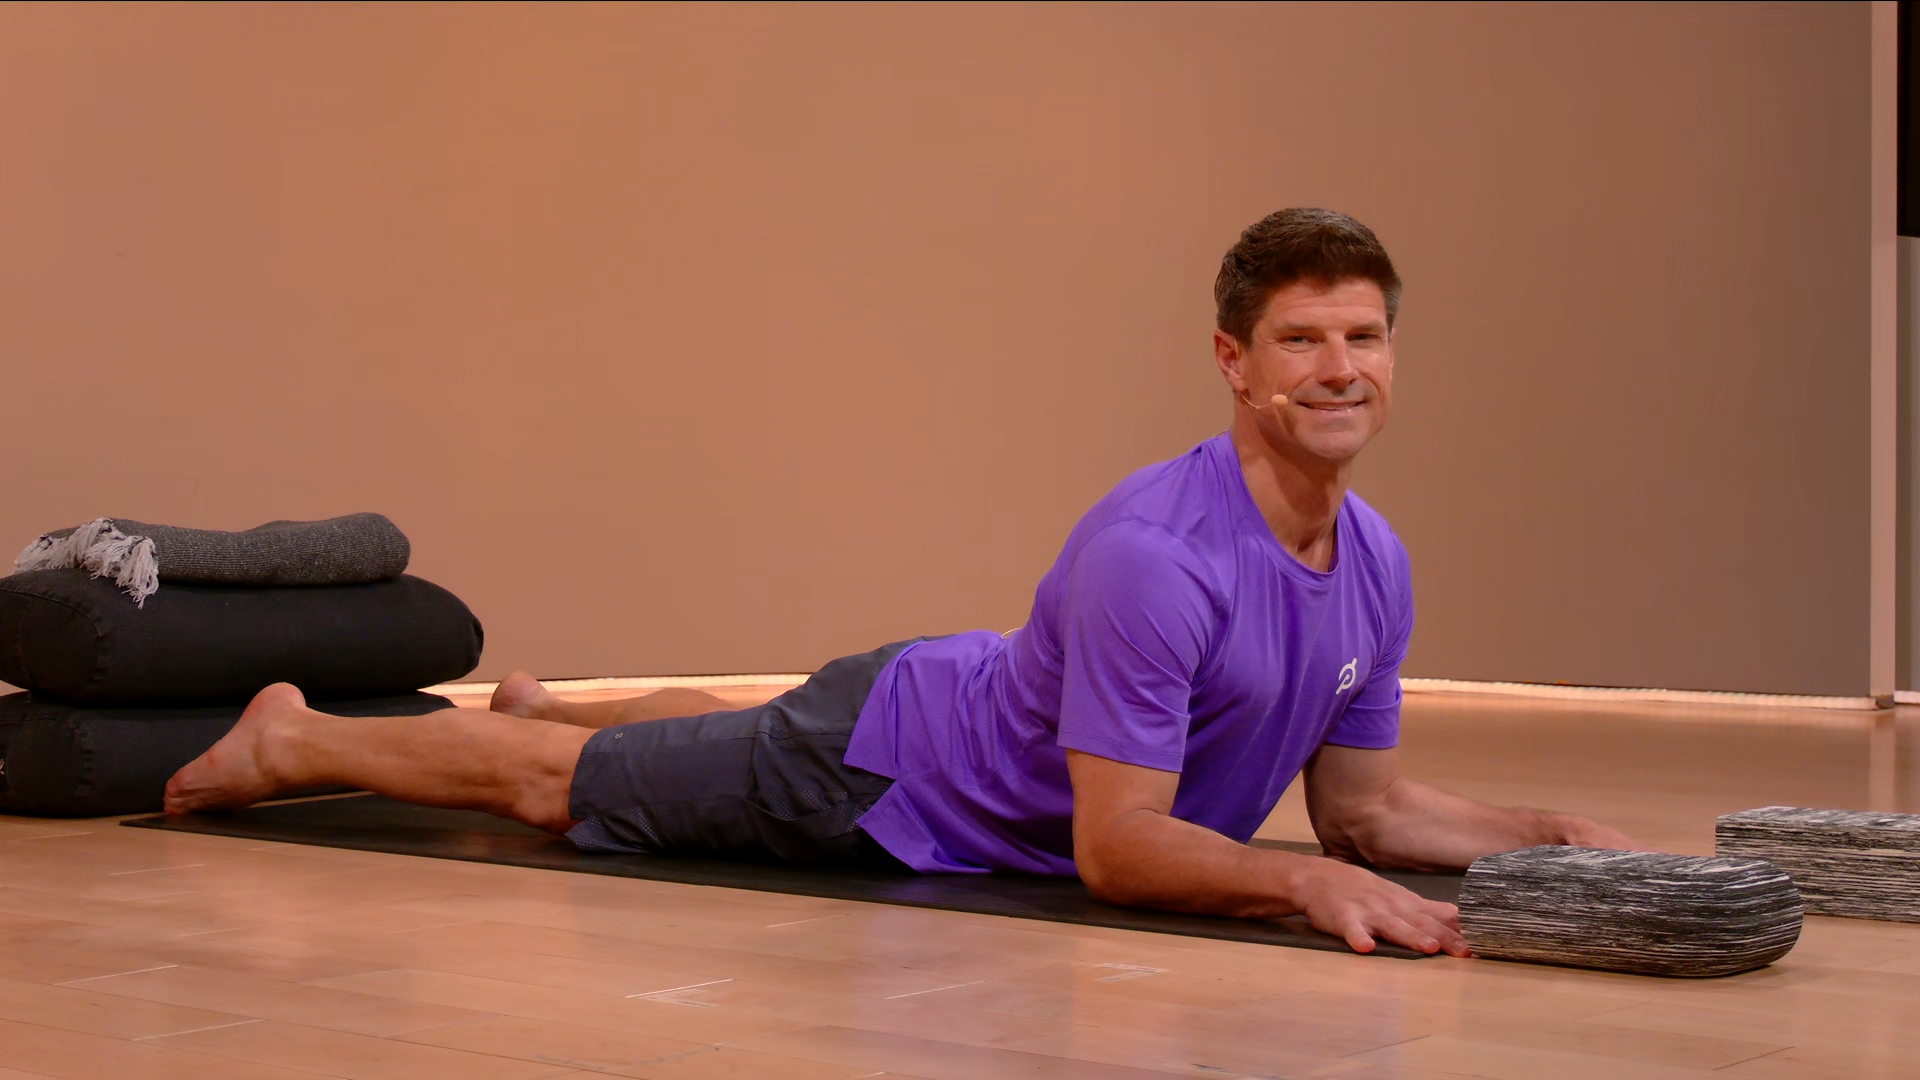
4. Sphinx Pose (Salamba Bhujangasana)
If you’re hunched over a laptop or desk all day, Sphinx Pose can help counteract the negative effects that come from those sedentary hours. Take it from us: You might have a hard time leaving this pose once your five minutes are up.
Begin lying down on your stomach with your forearms parallel to each other on the ground. Your elbows should be stacked under your shoulders.
Gently lift your torso off the ground by pulling your shoulders away from your neck and letting your shoulder blades slide down your back.
Keep your hips and legs firmly rooted on the floor.
Hold this position for three to five minutes.
Muscles worked: Core, hip flexors, spine
5. Swan Pose (Hamsasana)
Swan Pose is quite similar to Pigeon Pose (Kapotasana), but it has a different intent. As a Yin Yoga pose, Swan Pose aims to help you fully relax and relieve tension from your muscles for a thorough fascia release. Feel free to use a yoga blanket, bolster, or block under your bent hip for extra support.
Begin in a tabletop position.
Slide your left knee forward, placing it behind your left wrist. Make sure your left ankle is positioned in front of your right hip and flex your left foot.
Slide your right leg straight out behind you.
Keep your weight centered between your hips, then gently slide your arms forward as you let gravity pull your upper body down. You should feel a gentle sensation in your hips as you stretch forward.
Hold this position for three to five minutes. Then, repeat it on your right side.
Muscles worked: Hips, hip flexors
6. Frog Pose (Mandukasana)
Frog Pose is a juicy hip stretch. Amazing as it can feel, it’s easy to go too far and stretch past your limits. Remember: You’re looking to reach the edge of your discomfort, not go anywhere beyond it.
Begin in a tabletop position.
Spread your knees wide but keep your shins parallel to the floor.
Point your feet outward so that your toes form a right angle with your ankle.
Keep your hips in line with your knees as you slowly sink into your elbows, pressing your forearms to the floor.
You can extend your arms straight out or deepen the pose by pushing your chest flat to the mat. You should start to feel gentle sensations in your inner thighs.
Hold this position for three to five minutes.
Muscles worked: Inner thighs, hips
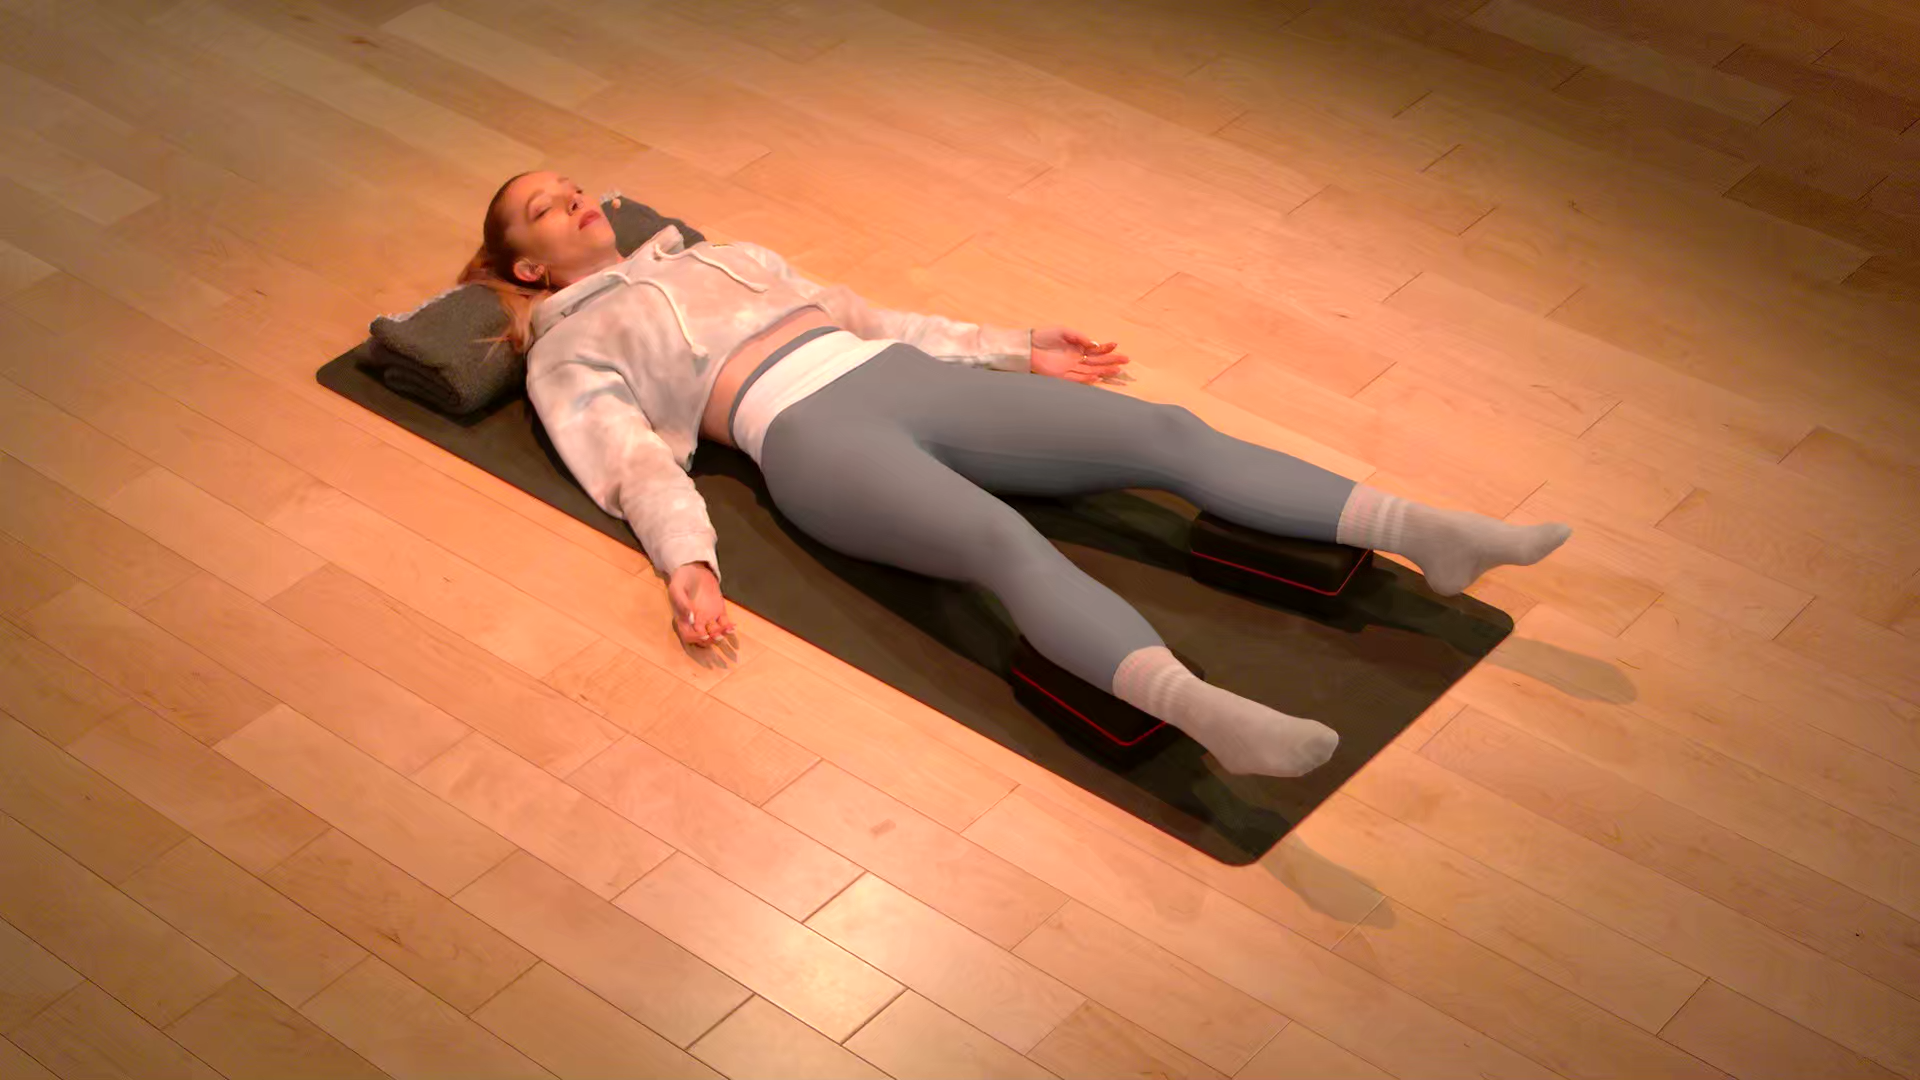
7. Supported Fish Pose (Matsyasana)
In Supported Fish Pose, you use two yoga blocks and gravity to relax your shoulders, which is especially crucial if you spend hours hunched over a laptop or desk. Play around with block height, and if you don’t have blocks, swap in a foam roller.
Sit down on your yoga mat with your legs extended or your knees bent with your feet flat on the floor. Make sure you have two yoga blocks nearby.
Place one yoga block lengthwise across your mat at either low or medium height.
Place the other yoga block a few inches above the first at either the medium or high height.
Recline so the first block is underneath your shoulder blades and the second block supports your head. Adjust the blocks’ height and positioning so that you feel comfortable and supported.
Spread your arms into an upside-down “V" position and allow your chest muscles to relax.
Hold this position for three to five minutes.
Muscles worked: Hip flexors, upper back
8. Seal Pose
We recommend doing this Yin Yoga pose for after an intense abs workout. One note: Seal Pose can mildly compress your lumbar spine, so it may not be the best choice if you experience low back pain.
Lie on your stomach with your legs extended long.
Place your palms flat on the floor in front of you and straighten your arms to raise your upper body off the ground.
Play around with your hand positioning. You can extend your hands farther in front of you or closer to your body. You can also lower down to your elbows if the pose feels too intense.
Hold this position for one to three minutes
Muscles worked: Back, abs, hip flexors
GibsonPictures/E+ via Getty Images
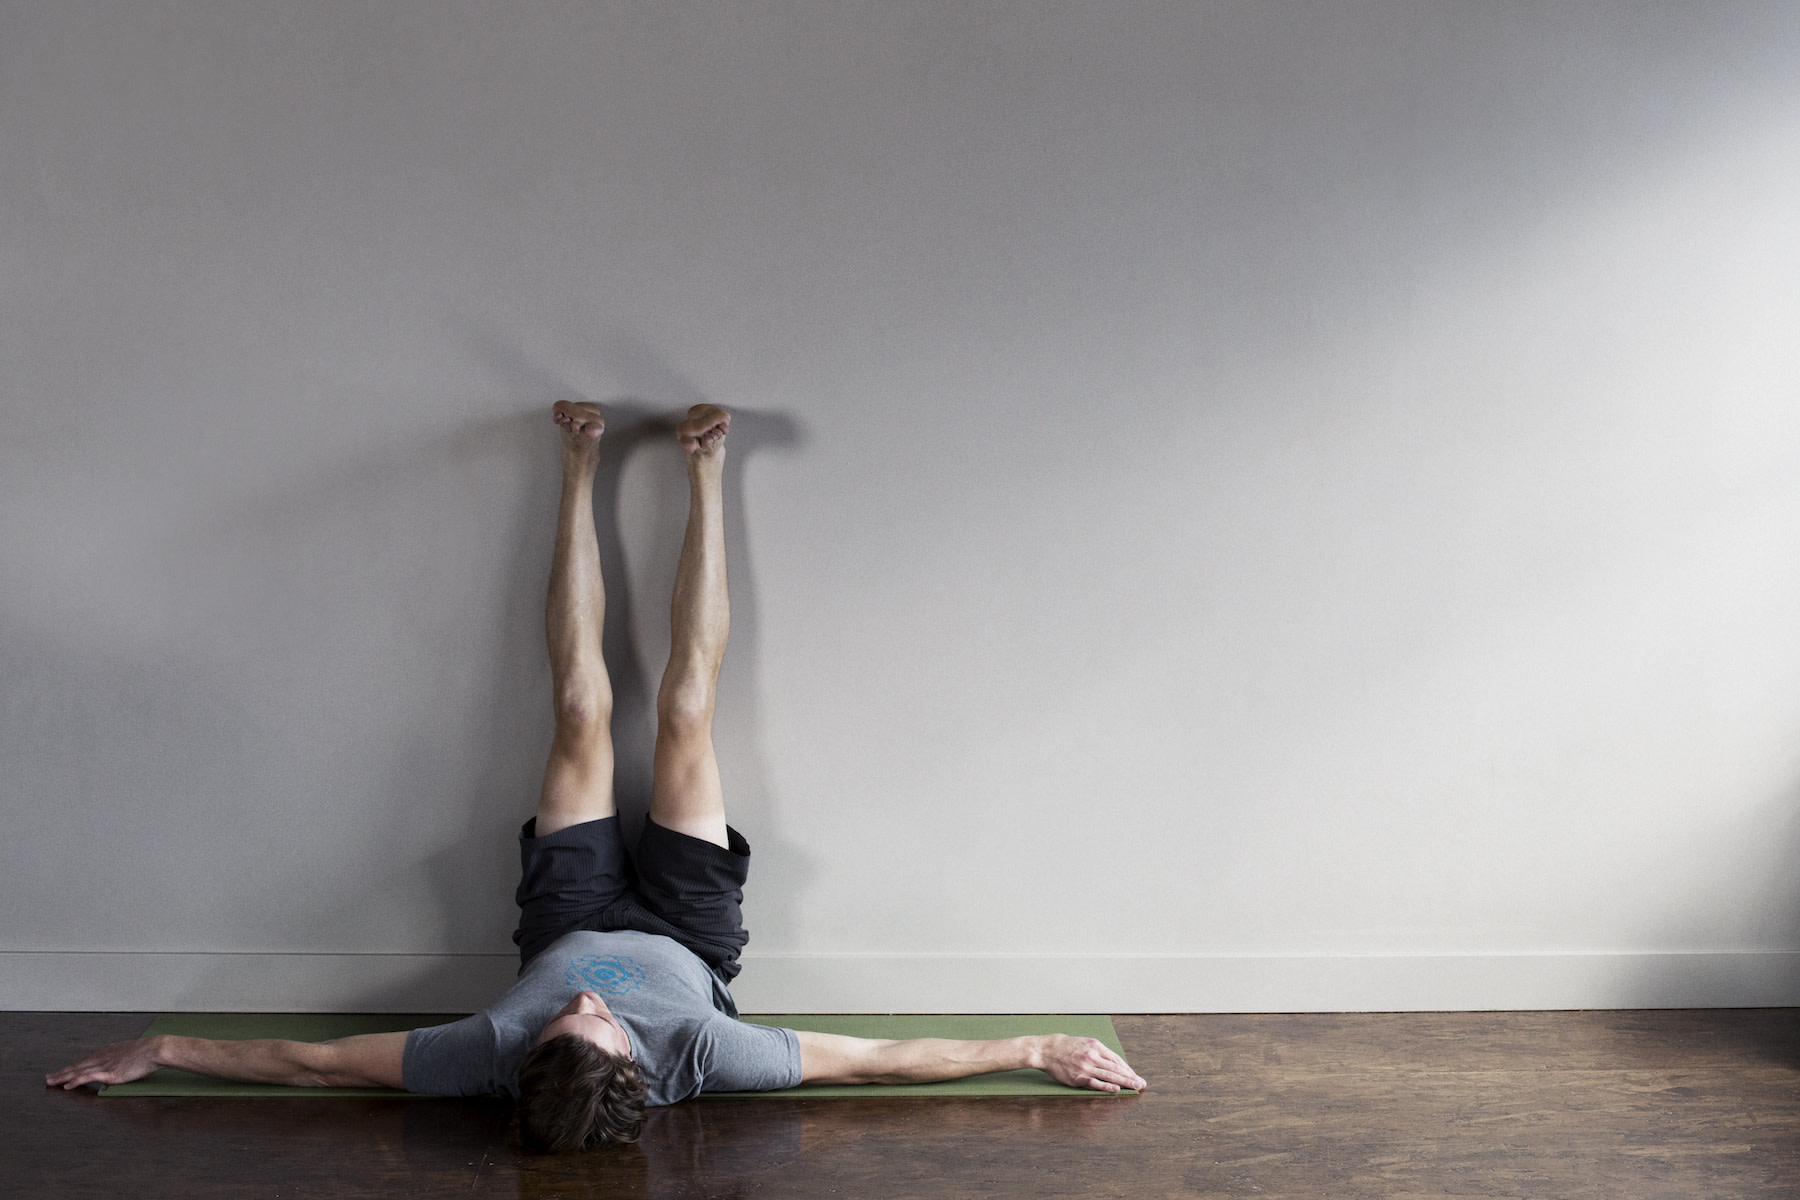
9. Legs Up the Wall Pose (Viparita Karani)
Legs Up the Wall Pose is great to practice if you’re looking to recover from a long run or endurance activity. For extra comfort, place a pillow or blanket under your head. You can also place your legs on a chair if this pose feels too uncomfortable.
Place your mat perpendicular to a wall.
Sit with one side of your body against the wall. Lie on the other side and swing both of your legs up against the wall, keeping your sacrum as close to the wall as feels comfortable.
Hold this position for three to five minutes
Muscles worked: Hamstrings, lower back
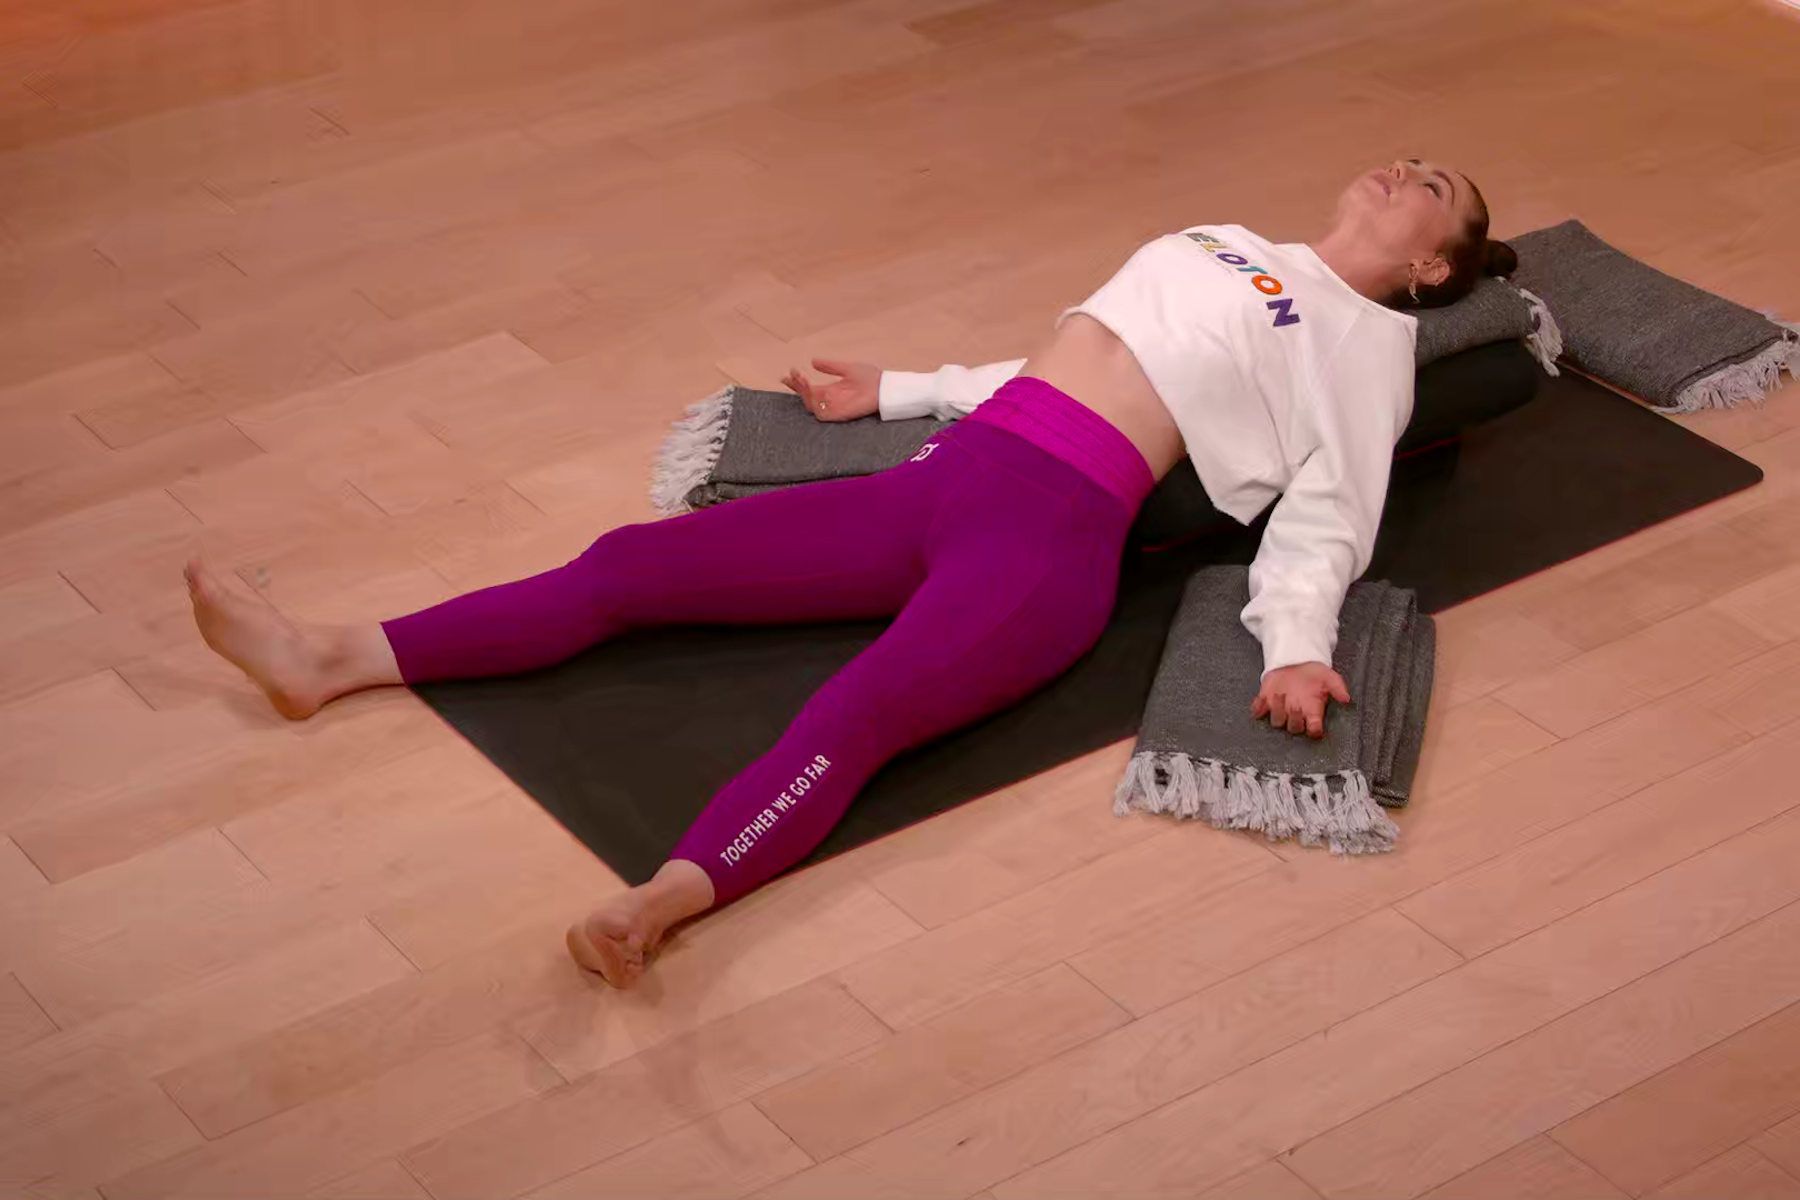
10. Savasana Pose
Savasana Pose should be your final resting pose at the end of a Yin Yoga sequence. We recommend adding in some mindfulness practices, like a body scan meditation, while you hold the pose.
Lie flat on your back, with your legs extended long and your arms by your side.
Close your eyes and relax each part of your body, starting at the crown of your head and finishing at the tips of your toes.
Identify areas of your body that feel tight or strained and actively send your breath and consciousness to them to help yourself fully relax.
Lie in this position for three to five minutes before slowly bringing consciousness back into your body and mind.
Muscles worked: None. This pose is for total relaxation.
Is Yin Yoga Good for Beginners?
Yin Yoga is great for beginners because the poses are physically straightforward. “Yin Yoga is significantly more accessible than some of the more athletic workouts,” Denis says. “It might not be as low intensity as restorative yoga, but it is really easily accessible and the modifications make it open to nearly anyone.”
That said, don’t expect Yin Yoga to feel completely effortless. “The real challenge with Yin Yoga is when you're in a single pose for five or six minutes. You have to accept where you are with the pose instead of backing off or doing the comfortable or easy thing,” Denis says. “We notice where our minds and bodies go when things are easy and when things are difficult, and Yin Yoga is about finding that Goldilocks spot within your own perceived intensity scale.”
Due to the long hold times and intense sensations caused by some Yin Yoga poses, beginners should always listen to and respect their minds and bodies. If you feel pain, pull back and consult a medical professional.
How to Integrate Yin Yoga Into Your Routine
The frequency of your Yin Yoga practice is up to you. “I know people that do it every day,” Denis says. “It really depends on the frequency that's going to work best for you.” If you’re new to yoga, take it slow out of the gate. “Start with once a week. If your mind and body respond positively to it, start with a couple of times per week and then as often as you need,” Denis recommends.
One easy place in your schedule to slot in Yin Yoga? Your recovery day. "Because Yin Yoga can be so mentally and emotionally confronting, it's a sneaky way for you to stay engaged without a heavy demand on your body energetically,” Denis says. “It's not super intense. It's not a Power Zone Max ride. It's not Total Strength. But it is a way for you to stay engaged with yourself mentally without having to tax the body so significantly.”
The Takeaway
Whether you’re just developing a yoga practice or you’re a devoted runner who needs help prioritizing recovery, Yin Yoga can fit into your routine. Adding Yin Yoga poses to your weekly recovery day can help improve flexibility and circulation while also promoting recovery and building your mental endurance. Plus, as Denis points out, Yin Yoga perfectly straddles the line between being “a little too hard” and “a little too easy.”
“If it's too easy, my mind starts to wander. If it's too hard, my mind starts to wander,” he says. “Finding that sweet spot in between is what Yin Yoga can be really helpful for.” You can apply the same sensation to cycling, running, strength training, or any other form of movement. “You’ll find yourself engaging on a different level,” Denis says.
This content is for informational and educational purposes only and does not constitute individualized advice. It is not intended to replace professional medical evaluation, diagnosis, or treatment. Seek the advice of your physician for questions you may have regarding your health or a medical condition. If you are having a medical emergency, call your physician or 911 immediately.
Read More

Yoga
These 9 Restorative Yoga Poses Will Give You the Relief You're Craving
Yoga
How Yoga Can Support Better Posture—and 6 Poses to Try

Yoga
Everything You Need to Know About Slow Flow Yoga, Including Why It’s Perfect for Beginners
Yoga
Sun Salutations Are a Critical Part of Your Yoga Practice. Here's How to Flow Through Them Confidently
This content is for informational and educational purposes only and does not constitute individualized advice. It is not intended to replace professional medical evaluation, diagnosis, or treatment. Seek the advice of your physician for questions you may have regarding your health or a medical condition. If you are having a medical emergency, call your physician or 911 immediately.
Want to strengthen your yoga practice?
We can help. Enter your email to get articles, instructor tips, and updates from Peloton sent to your inbox.
By providing your email address, you agree to receive marketing communications from Peloton.
For more about how we use your information, see our Privacy Policy.